A/U AutoPilot Processing
This option is used to select the individual programs which you wish to include in an AutoPilot batch. Also through this option, you will answer related prompts in each program selected. Before the batch actually begins to process, you will have the opportunity to name the batch and thus save these selections for future use. You may also use this option to answer the prompts differently or add or delete programs in the batch.
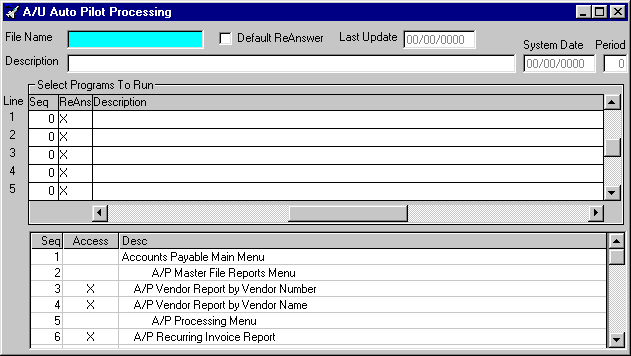
After selecting this option from the A/U Processing Menu, the computer will display the A/U AutoPilot Processing screen as follows:
A) To add a new batch to the file, enter the unique File Name that you are assigning to this batch and press [TAB].
B) To view or change an existing batch's information, enter the File Name of the batch you wish to change, or Perform A Search to find a record. Upon entering a valid name, the computer will display the information stored for this batch. Make changes in the same manner you entered the data.
If you wish to re-answer the questions for the programs in the batch, check the Default ReAnswer option box. If you wish to keep the answers that you entered the last time this batch was run, leave this box unchecked. Enter the Description for this batch.
Enter the Seq for the program you wish to include in this batch. This is the Seq (Sequence Number) from the grid on the lower portion of the screen. You may scroll through this grid to find the option you want and double-click a field from that line of the grid (or you may enter the Seq in the top grid). (Options to which you have Access will contain an "X". These are the only items which you may select.) The Description will be displayed for verification and the ReAns (Re-answer) field will default to an “X” on any new line.
Continue entering Seqs for other options you wish included in this batch.
Review the data you have entered (or changed) on the screens. If you wish to SAVE the information, click on the Save button on the Toolbar, pick the Save option from the File Menu, or press [Ctrl][S]. If you do NOT wish to save the information, click on the Cancel button on the toolbar, pick the Cancel option from the File Menu, or press [Ctrl][L].
The save option will not cause the batch to process immediately. You may select Accept to save the batch and cause the batch to begin processing immediately. After accepting the batch, the prompts associated with the individual programs you selected will be displayed one-by-one. Answer these prompts as you normally would when executing the program. If you are unsure about a specific option, review the option description associated with the program.
At any time while answering prompts for the programs selected, if you select the Cancel option you will see a screen similar to the following:
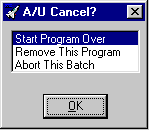
Select Start program over if you wish to start this specific program over to answer the prompts differently.
Select Remove this program if you wish to remove this specific program from the batch for this time running the batch.
Select Abort this batch if you wish to abort (stop execution of) the entire batch.
After you have answered the prompts displayed with each program, the batch will actually begin processing and the computer will execute the programs in the order they were selected. At this point, no additional operator intervention is necessary. It is important to have an ample supply of paper in the printer if your batch includes many lengthy reports.
At any time while the batch of programs is running, if you select the Cancel option you will see a screen similar to the following:
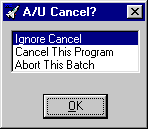
Select Ignore Cancel if you selected the cancel option accidentally.
Select Cancel this program if you wish to stop execution of this one specific program.
Select Abort this batch if you wish to abort (stop execution of ) the entire batch.