C/R Deposit Maintenance
This option is used to initially enter deposits into the CHECK/DEPOSIT MASTER file, add new deposits, or make changes as necessary to Check/Deposit Master information currently existing in the file.
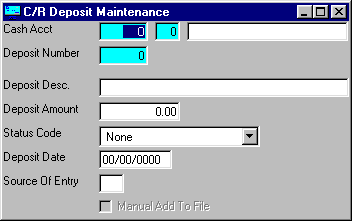
After selecting this option from the C/R Master File Maintenance Menu, the computer will display the C/R Deposit Maintenance screen as follows:
A) To add a new Deposit to the file, enter the Cash Acct (Account and Department) that you are assigning to this deposit or Perform A Search to find an Account record. Next enter the unique Deposit Number that you are assigning to this deposit and press [TAB].
B) To view or change an existing deposit’s information, enter the Cash Acct (Account and Department) of the account whose record you wish to change, or Perform A Search to find an Account record. Next enter the Deposit Number that you wish to edit Perform A Search to find a deposit record. Upon entering a valid number, the computer will display the master information stored for this deposit. Make changes in the same manner you entered the data.
Enter the Remaining information on this screen as follows:
Enter the Deposit Desc (description) used to describe the deposit. An example of this may be VISA Deposit 05/15/1999 which describes a VISA deposit posted on May 15,1999.
Enter the Deposit Amount and Deposit Date for this deposit.
The Status Code field allows you to enter the status (None, Reconciled, or Voided) of this deposit number. You can display the available options by clicking this field with your mouse or scrolling through the list by using the up/down arrow keys.
Enter the Source Of Entry for this deposit which indicates where the deposit came from (i.e. BI=Billing and Inventory).
Review the data you have entered (or changed) on the screen. If you wish to SAVE the information, click on the Save button on the Toolbar, pick the Save option from the File Menu, or press [Ctrl][S]. If you do NOT wish to save the information, click on the Cancel button on the toolbar, pick the Cancel option from the File Menu, or press [Ctrl][L].