P/O Labels
This option is taken to Print A Report (or view on the screen) labels for products in the PURCHASE ORDER file.
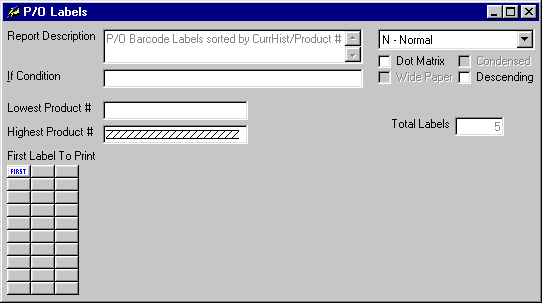
After selecting this option from the P/O Processing Menu, the computer will display the P/O Labels screen as follows:
Enter the information on this screen as follows:
The Report Description will display for verification. The If Condition may usually be edited, if you wish to change certain conditions for the report. Reports may be printed Normally, Group and Grand Totals Only, or Grand Totals Only. If you have a Dot Matrix printer, you may then specify whether the report should print in Condensed mode, and may specify if your printer is using Wide Paper. You may also print the report in Descending (rather than ascending) order.
You will then be allowed to specify a Lowest and Highest range for the report. This range will be based upon the sorting fields in the file.
Specify the location of the FIRST label you wish to start printing (if you have a partial sheet of labels).
After specifying your lowest and highest ranges, you may calculate how many labels will print by clicking the button displayed above.
Review the data you have entered on the screen. If you wish to ACCEPT your responses and PRINT the labels, click on the Accept icon on the Toolbar, pick the Accept option from the File Menu, or press [Ctrl][A]. If you wish to SAVE the defaults and PRINT the labels, click on the Save icon on the Toolbar, pick the Save option from the File Menu, or press [Ctrl][S]. If you do NOT wish to print the information, click on the Cancel icon on the toolbar, pick the Cancel option from the File Menu, or press [Ctrl][L] and the system will exit this program.
After you have accepted (or saved) the information the computer will go through a posting procedure to make the labels ready to print. You are now ready to select the Printer and print the labels.
After the labels have printed successfully, you should click on the Update Printed Flag icon on Toolbar or press [Ctrl][U].