P/O Purchase Order Maintenance
This option is used to initially enter purchase orders into the PURCHASE ORDER file, add new purchase orders, make changes to existing purchase orders, and view posted purchase orders.
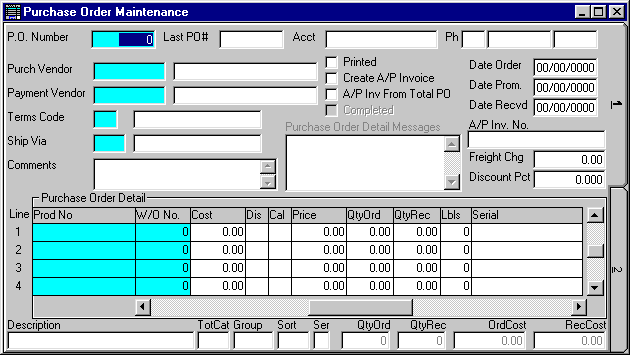
After selecting this option from the menu, the computer will display the P/O Purchase Order Maintenance screen as follows:
Enter the information on this screen as follows:
A) To add a new purchase order, leave the P.O. Number blank for the system to assign the next available purchase order number or enter an unused P.O. Number. The system will default the Date Ordered to the system date.
B) To view or change an existing purchase order, enter the P.O. Number of the purchase order you wish to change. If you wish to FIND the information, click on the Find icon on the Toolbar, pick the Find option from the Edit Menu, or press [Ctrl][F]. Upon entering a valid number, the computer will display the information stored for this purchase order. Make changes in the same manner you entered the data.
Enter the Purch Vendor (Purchased From Vendor) for this purchase order. If you wish to FIND the information, click on the Find icon on the Toolbar, pick the Find option from the Edit Menu, or press [Ctrl][F]. Upon entering a valid number, the computer will display the name and default the Payment Vendor stored for the record.
Enter the Payment Vendor for this purchase order. If you wish to FIND the information, click on the Find icon on the Toolbar, pick the Find option from the Edit Menu, or press [Ctrl][F].
Enter the Terms Code for this purchase order. If you wish to FIND the information, click on the Find icon on the Toolbar, pick the Find option from the Edit Menu, or press [Ctrl][F]. Upon entering a valid code, the computer will display the description stored for the record.
Enter the Ship Via for this purchase order. If you wish to FIND the information, click on the Find icon on the Toolbar, pick the Find option from the Edit Menu, or press [Ctrl][F]. Upon entering a valid code, the computer will display the description stored for the record.
Enter any Comments for this purchase order.
You may select the Printed box to indicate that the P/O Purchase Order Form has already been printed.
You may select the Create A/P Invoice box to have the system automatically create an invoice in the A/P Temporary Invoice Maintenance option (when this purchase order is posted).
If you have Create A/P Invoice box checked, you may select the A/P Inv From Total PO box to have the system generate the A/P Invoice using the total purchase order amount. If the A/P Inv From Total PO box is NOT checked, the system will create an A/P Invoice using the total quantity received amount only.
Enter the Date Ordered for this purchase order.
Enter the Date Promised as the date that your vendor promised delivery for this purchase order.
Enter the Date Received for this purchase order. This date must be filled in before this purchase can be posted.
Enter the A/P Inv. No. (A/P Invoice Number) for this purchase order. If you have the Create A/P Invoice box selected, the system will use this field to create Invoice Number in Accounts Payable.
Enter the Freight Charge for this purchase order. If you use this field, the system will prorate the freight charge (by each received extended cost), and use this prorated amount to determine the cost of the product.
Enter the Discount Pct. (discount percent) for this purchase order.
Enter a detail line for each Product that you wish to order on this purchase order. Enter detail information as follows (the order for the following fields may not be identical to your screen):
Enter the Prod No. (Product Number) that you wish to order. If you wish to FIND the information, click on the Find icon on the Toolbar, pick the Find option from the Edit Menu, or press [Ctrl][F]. Upon entering a valid number, the computer will default the Cost as the last cost that you received this item from this vendor. It will also display the Description, Ctgy, Size, and Ser (Serialized Product?) for this product. It may also display messages in the Purchase Order Detail Messages field.
If you wish to tie this product to a Work Order, enter the W/O No. If you wish to FIND a Work Order, click on the Find icon on the Toolbar, pick the Find option from the Edit Menu, or press [Ctrl][F].
Enter the Cost of this product.
If you want this product to use the Disc Pct. (percent) that you keyed in above, mark the Dis (Discount) box. You may toggle this selection by pressing the space bar or double-clicking the mouse.
If you want this product to automatically calculate a new price, mark the Cal (Calculate) box. You may toggle this selection by pressing the space bar or double-clicking the mouse.
Enter the selling Price (to your customer) for this product.
Enter the QtyOrd (Quantity Ordered) for this product.
Enter the QtyRec (Quantity Received) for this product. (If the quantity received does not equal the quantity ordered, the system will automatically generate a new line for the difference.)
If you want to print purchase order labels for this product, enter the quantity of labels that you wish to print in the Lbls (Labels) field.
If this product is a Serialized Product, enter the Serial Number(s) for this product (when you receive them into inventory).
Enter any Extra Cents for this product. This amount will be added to the Ext Cost (extended) which is computed from the Cost times the QtyOrd.
If more than 1 A/P Inv. # (accounts payable invoice number) is needed, you may enter that number on each line.
If the H box is marked, that indicates that this line has already been posted and you cannot change any information.
The Vendor Part number is defaulted from the PRODUCT master record, if known. You may enter or override this number.
If a W/O No. (work order number) is entered, the Cust # (customer number) will be displayed.
Enter the Acknowledgement # (number) for this product.
The calculated Frt Cost (freight) and Date Rcv’d (received) will be displayed.
The Description is defaulted from the PRODUCT master record. You may enter or override this field.
Enter any Comments for this product.
When you have finished entering data on the first screen, click on tab 2 or press [Alt][2] to display the second screen as follows:

Enter the Tracking Number for this purchase order.
Enter the Order Placed By salesman number for this purchase order. If you wish to FIND the information, click on the Find icon on the Toolbar, pick the Find option from the Edit Menu, or press [Ctrl][F]. Upon entering a valid number, the computer will display the name for verification.
If you want to create a sales order from this P.O., mark the Create Sales Order box.
Enter the Ship To Number (Ship To Customer Number) for the sales order. If you wish to FIND the information, click on the Find icon on the Toolbar, pick the Find option from the Edit Menu, or press [Ctrl][F]. Upon entering a valid number, the computer will display the name and address, and default the Bill To Number stored for the record.
Enter the Bill To Number (Bill To Customer Number) for the sales order. If you wish to FIND the information, click on the Find icon on the Toolbar, pick the Find option from the Edit Menu, or press [Ctrl][F]. Upon entering a valid number, the computer will display the name stored in the Bill To Customer’s record.
You may override the Ship To Name, Address 1, Address 2, City, State, and Zip code fields.
Enter the Job # (number) for the sales order. If you wish to FIND the information, click on the Find icon on the Toolbar, pick the Find option from the Edit Menu, or press [Ctrl][F]. Upon entering a valid number, the computer will display the job name stored in the record.
You may enter the Customer P.O. # (number).
Enter up to 5 (five) Slmn # (Salesman numbers) for this order and their respective Pct. (commission percentage). If you wish to FIND the information, click on the Find icon on the Toolbar, pick the Find option from the Edit Menu, or press [Ctrl][F]. Upon entering a valid code, the computer will display the name stored for the record.
You may enter the Cust Job # (customer job number) and Printed Comments for the sales order.
Review the data you have entered (or changed) on the screen. If you wish to SAVE the information, click on the Save icon on the Toolbar, pick the Save option from the File Menu, or press [Ctrl][S]. If you do NOT wish to save the information, click on the Cancel icon on the toolbar, pick the Cancel option from the File Menu, or press [Ctrl][L].