A/P Vendor Maintenance
This option is used to initially enter vendors into the VENDOR MASTER file, add new vendors, or make changes as necessary to Vendor Master information currently existing in the file.
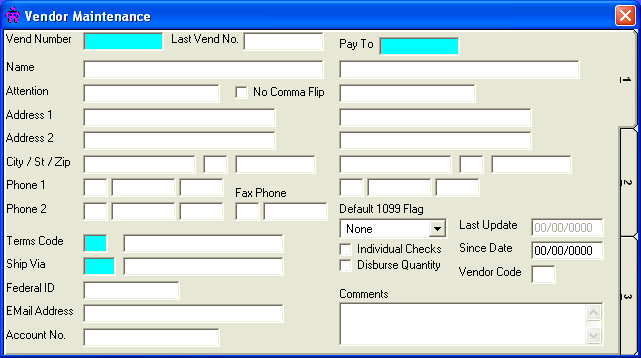
After selecting this option from the A/P Master File Maintenance Menu, the computer will display the Vendor Maintenance screen as follows:
A) To add a new Vendor to the file, enter the unique Vend Number (Vendor number) that you are assigning to this vendor (or leave the Vend Number blank to have the system assign a new number) and press [TAB]. Vendor Numbers can be up to 10 characters in length (Vendor Numbers starting with "ZZZZZZZ" are reserved for use as Miscellaneous Vendors).
B) To view or change an existing Vendor's information, enter the Vend Number (Vendor number) of the vendor whose record you wish to change, or Perform A Search to find a Vendor record. Upon entering a valid number, the computer will display the master information stored for this vendor. Make changes in the same manner you entered the data.
Enter the Remaining information on this screen as follows:
If the Vendor is an individual person, enter their last Name first followed by a comma, and then their first name. For example, to enter "John Smith", you would enter “Smith, John” so that you may find this record under the letter “S” for “Smith”. If the vendor is a business firm, enter the company name (i.e., "K M Printing, Inc.")
NOTE: Vendor names are entered in this manner in order to sort the file by name in alphabetical order. Therefore, you may wish to enter company names such as "The Computer Co." as “Computer Co., The” (if you wish this company to appear under "C" as opposed to "T").
No Comma Flip, if marked, causes businesses (like “K M Printing, Inc.”) to print to “K M Printing, Inc.” instead of “Inc. K M Printing”
Attention allows you to enter an individual or department to which payments for this vendor should be directed.
The Address (1 and 2), City, State, and Zip Code should be entered.
Phone (1 and 2) consist of a 3 character area code, 8 character phone number (be sure to include the hyphen if you wish to see it), and a 5 character extension number.
Fax Phone consists of a 3 character area code and an 8 character phone number (be sure to include the hyphen if you wish to see it).
Enter the Terms Code for your normal payment terms for this Vendor, or Peform A Search to find a Terms Code record. Upon entering a valid code, the computer will display the description stored for the record.
Enter the Ship Via for your normal shipping from this Vendor, or Peform A Search to find a Ship Via record. Upon entering a valid code, the computer will display the description stored for the record.
If applicable, enter the Federal ID number (if the vendor is a business) or Social Security Number (if the vendor is an individual). Remember that you must have a value in this field in order for a 1099 to be printed for the vendor.
The E-Mail Address of the Vendor may be entered along with the Account No. assigned to you by the Vendor.
The Pay To Vendor number is designed for vendors with a payment address different than their mailing address. If the vendor has a special Pay Address, enter the Vend Number of the Pay To Vendor here. If the vendor does not have a special payment address, the Pay To number should be the same as the Vend Number of this Vendor record. You may Perform A Search to find a Pay To record.
The computer will default to “None” in the Default 1099 Flag field. If most invoices for this Vendor would NOT cause any 1099 to be generated, leave this value as “None”. If most invoices for this Vendor would cause a 1099-MISC form to be generated, change this value to “Miscellaneous”. If most invoices for this Vendor would cause a 1099-INT form to be generated, change this value to “Interest”. If most invoices for this Vendor would cause a 1099-DIV form to be generated, change this value to “Dividend”. If most invoices for this Vendor are for rent, change this value to “Rent”.
The Last Update field indicates the last time master information for this vendor was changed. The software will maintain this date.
The Individual Checks field is used to determine how you wish to print checks for this vendor. If you are paying multiple invoices for the vendor and only wish to print one check (for all the invoices selected to be paid), leave the box unchecked (Consolidated). If you wish to print an Individual check for each invoice, check this box (Individual).
If you check the Disburse Quantity box, the computer will display a screen in the Invoice Maintenance program that will allow you to disburse quantities on invoices for this vendor.
In the Since Date, enter the date you started doing business with this Vendor.
You may enter a Vendor Code and Comments about this Vendor.
When you have finished entering data on the first screen, click on tab 2 or press [Alt][2] to display the second screen as follows:
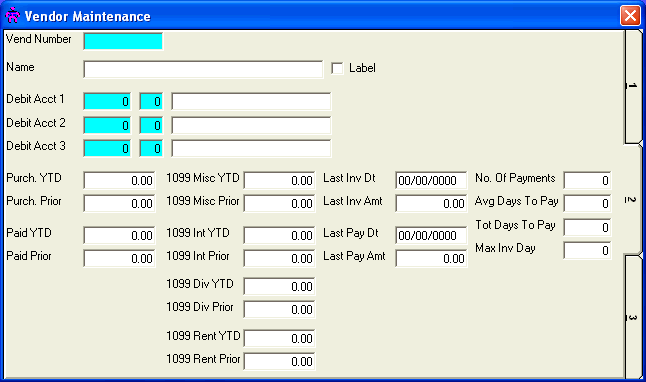
The Label box may be checked in order to mark the Vendor for a particular run of printing Vendor mailing labels.
Up to 3 default Debit Accts (General Ledger Number and department) may be entered for the Vendor. You may Perform A Search to find a G/L Account record. Upon entering a valid number, the computer will display the description stored for the record.
The remaining fields are automatically updated by the computer when checks are posted. Leave these fields blank when entering a new vendor. The amounts in the 1099 YTD fields only accumulate amounts you have indicated are accountable for 1099 purposes (when entering invoices) and will be printed on the 1099s at the year end. If your initial conversion to the Accounts Payable module does not coincide with the beginning of the Calendar year, you will need to enter the amount you have paid the Vendor so far this year in the 1099 YTD fields. If you do not enter this amount, the amount printed on the 1099 will not be correct.
When you have finished entering data on the second screen, click on tab 3 or press [Alt][3] to display the third screen as follows:
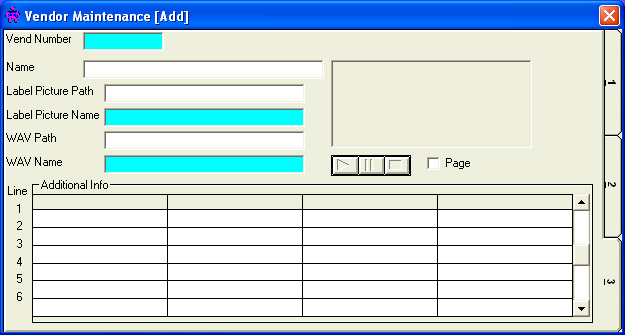
The Label Picture Path and Label Picture Name fields allow you to specify a logo-based bitmap file to be used when printing Vendor mailing labels. A picture of the specified graphic will be displayed if these fields are entered properly. The WAV Path and WAV Name fields allow you to specify a sound (wave) file to be used throughout the system, associated with this Vendor. The specified sound may be played via the sound bar if these fields are entered properly. If paging capabilities are to be allowed for this Vendor, check the Page box. You may also enter any of the 4 user-defined Additional Info fields you set up in the A/P Control File Maintenance program.
Review the data you have entered (or changed) on the screens. If you wish to SAVE the information, click on the Save button on the Toolbar, pick the Save option from the File Menu, or press [Ctrl][S]. If you do NOT wish to save the information, click on the Cancel button on the toolbar, pick the Cancel option from the File Menu, or press [Ctrl][L].