A/P Control File Maintenance
The A/P CONTROL file stores default values for special information which applies to processing for the A/P system. This option is used to initially enter the data in the A/P CONTROL file and then to make changes to the default values as needed.
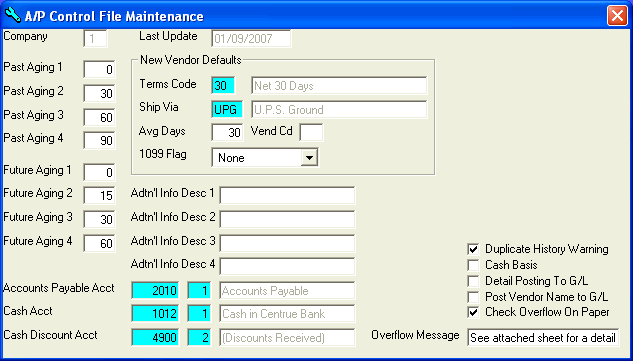
After selecting this option from the A/P Master File Maintenance Menu, the A/P Control File Maintenance screen will be displayed as follows:

Enter a number of days in each of the Aging fields. The 8 fields are used to define breaks for aging Accounts Payable on the A/P Unpaid Invoice Aging Report. An example might be:
Past Due Aging 1 __0 Future Aging 1 __0
Past Due Aging 2 _15 Future Aging 2 _10
Past Due Aging 3 _30 Future Aging 3 _20
Past Due Aging 4 _60 Future Aging 4 _30
Note that these fields may be changed at any time, although Aging 1 should always be 0.
Enter the default Terms Code for a new Vendor (or Perform A Search to find one). The description will be displayed for verification.
Enter the default Ship Via for a new Vendor (or Perform A Search to find one). The description will be displayed for verification.
Enter the default Avg Days (average days) that it takes to pay a new Vendor. Enter the default Vend Cd (Vendor code) that you want for a new Vendor. Enter the default 1099 Flag (None, MISCellaneous, INTerest, DIVidend) that you want for a new Vendor. Everything in the New Vendor Defaults section will automatically be entered for each new Vendor, although you may override any default value while adding new Vendors.
You may enter up to 4 Additional Info Descriptions. These allow you to track up to 4 user-defined fields of information for your vendors.
Enter the default Accounts Payable Acct (G/L account number and department) for your A/P account. When entering invoices, this account number will automatically be displayed for the credit side of the entry. The debit side of the entry will be entered in the Temporary Invoice Maintenance option.
Enter the default Cash Acct (G/L account number and department) for your cash account. When making payments (checks), this account number will automatically be displayed for the credit side of the entry. The debit side of the entry will be the A/P account entered through Temporary Invoice Maintenance.
Enter the default Cash Discount Acct (G/L account number and department) for your cash discount account. This account number will be used for a credit side entry during Check Posting. The A/P account entered through Temporary Invoice Maintenance will be used for the debit side of the entry.
If you wish a warning when you try to enter an invoice number that already exists for a Vendor, check the Duplicate History Warning option box.
If you wish Accounts Payable to be processed on a Cash Basis instead of an accrual basis, check this option box.
If you wish Accounts Payable to be posted to the General Ledger module in a detail fashion instead of summary, check the Detail Post To G/L option box. If you select detail posting, each detail line on invoices will be posted one at a time. If you select summary posting, entries to accounts are accumulated by G/L Number, then totals for each G/L Number are posted in lump sums.
If you wish the Vendor Name to be posted to General Ledger instead of the Invoice Description (when posting detail), check the Post Vendor Name To G/L option box.
If you wish to print Check Overflow On Paper (when you have more invoices than can fit on a check stub), check this option box. You may then enter the Overflow Message that will print on the check stub.
Review the data you have entered (or changed) on the screens. If you wish to SAVE the information, click on the Save button on the Toolbar, pick the Save option from the File Menu, or press [Ctrl][S]. If you do NOT wish to save the information, click on the Cancel button on the toolbar, pick the Cancel option from the File Menu, or press [Ctrl][L].