This option is used to enter new invoices (unpaid or previously paid with manual checks) into the TEMPORARY INVOICE file and to make changes to invoices currently in the TEMPORARY INVOICE file.
Through this option you will set up the journal entries that will eventually be posted to the G/L TEMPORARY file. You may also specify that this invoice should be billed back to customers on invoices in our Accounts Receivable module. This integration has been incorporated into the program to eliminate having to enter data in other modules unnecessarily when specific information originates from an Accounts Payable Invoice. Details for this integration are discussed later in this option description.
NOTE: Even though you may have paid an invoice with a manual check, the invoice and manual check must be entered into the Accounts Payable module to maintain the integrity and completeness of your Accounts Payable data.
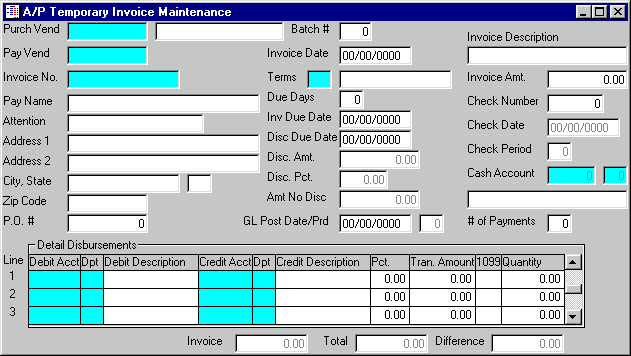
After selecting this option from the A/P Processing Menu, the screen will appear as follows:
A) To enter a new invoice, enter the Purch Vendor (Purchase Vendor Number) to whom the invoice is to be made, or Perform A Search to find a Vendor, followed by the Payment Vendor (this will default when you enter the Purch Vendor). Again, you may Perform A Search to find a Vendor.
NOTE: You may enter an invoice for a Miscellaneous Vendor in the Purch Vendor field. This procedure should be used for vendors from whom you will only make one purchase. If you have an invoice from a new vendor whom you may make additional purchases, you should add the vendor to the VENDOR MASTER file (prior to entering the invoice). If you enter a Miscellaneous Vendor, your next step is to enter this vendor's Name, Address, City, St., and Zip.
Next, enter the Invoice Number you are assigning to this invoice.
NOTE: The Invoice Number field cannot be left blank. If you do not have an invoice number, create a fictitious number, unique from other invoice numbers you have entered for this same vendor. An example would be to use the date as an invoice number. It is very important to enter a unique Invoice Number for each invoice to the same vendor (so the computer will not append this information to an existing invoice for the vendor). You may re-use invoice numbers for different vendors. For example, assume for Payment Vendor TEA001 you have used Invoice Numbers 101 and 102. It is permissible to use these same Invoice Numbers for vendor ABC002. But you should not enter a new invoice for vendor TEA001 using 101 or 102 as the Invoice Number.
B) To change an existing invoice, enter the the Purch Vendor (Purchase Vendor Number), Payment Vendor, and Invoice Number of the invoice you wish to change. Upon entering valid numbers, the remaining information will be displayed. Make changes in the same manner in which you entered the recurring invoice.
If applicable, enter a P.O. Number. Enter the Batch Number for posting this invoice. Invoices may be grouped in batches so that you may post only selected batches from the TEMPORARY INVOICE file and leave invoices in other batches in the file.
For example: you enter some invoices for which you need to write checks today and you assign the Batch Number "1" to each of the invoices. Also, you enter some more invoices (which you intend to pay at a later date and are not sure of the appropriate G/L Number disbursements) and assign "2" as the Batch Number to each of these invoices. When posting the TEMPORARY INVOICE file, you will only post for Batch Number 1 (thereby leaving the remaining batch 2 invoices in the TEMPORARY INVOICE file) so that you may make corrections to them later. Note that once an invoice is posted from the TEMPORARY INVOICE file, you may not make corrections to it; you may only make adjustments.
Enter the Invoice Date. Enter the Terms Code for this invoice, or Perform A Search to find a TERMS CODE record. Upon entering a valid code, the computer will display the description stored for the record.
Enter the Due Days (if Due Days are entered, they will calculate the Due Date) or enter the Inv Due Date (Invoice Due Date). If applicable, enter the Disc Due Date (Discount Due Date). If a Disc Due Date is entered, you may enter a Disc. Amt (Discount Amount) or Disc. Pct. (Discount Percent) and an Amt No Disc (amount that discount is not allowed on).
Enter the GL Post Date (General Ledger Posting Date) and the GL Post Prd (General Ledger Posting Period) will be displayed for verification.
Enter the Invoice Description as the description you wish to appear on the Accounts Payable invoice. Enter the Invoice Amt. (Amount).
If the invoice has been prepaid with a manual check, enter the Check Number, Check Date, and Cash Account of the check used to pay the invoice. The Check Period will be displayed for verification. Please note that if you enter a manual check number here, the invoice will appear in the "Selected" section of the Unpaid Invoice Report.
If you enter a # of Payments (number of payments), the system will divide your amounts as evenly as possible, and generate multiple invoices from the entries you have made. (If you are not allowed to specify the # of Payments, your Invoice Number may be too long to allow this feature.)
Enter a detail line for each disbursement you wish to make to a specific G/L Number and Department. By entering these disbursements, you are setting up the journal entries that will be posted to the G/L TEMPORARY file. Enter disbursements as follows:
Enter the General Ledger Number and Department of the General Ledger account you wish to debit, Debit Acct and Dpt fields; this is typically an expense account. Upon entering a valid G/L Number / Dept. Number combination, the Debit Description for the account will be displayed.
The Credit Acct and Dpt fields will default to the A/P (or Cash) account set-up in the A/P CONTROL file. Accept this account or enter the account you wish to credit over the default G/L Number and Department. Upon entering a valid G/L Number / Dept. Number combination, the Credit Description for the account will be displayed.
Enter the Pct. (percent) of the total Invoice Amt. (Amount) for this disbursement, or leave the Pct. field blank, and enter the Tran. Amount (Transaction Amount) of the disbursement.
If you are to provide a 1099 for the vendor to which this is being paid, enter [M]iscellaneous, [I]nterest, or [D]ividend in the 1099 field.
If you elected to disburse quantities for this vendor, enter the Quantity to be disbursed for this line item.
Repeat these steps until you have disbursed the entire Invoice Amt. (Amount). You may enter as many disbursements as necessary. When you reach the last line on the screen, the top line will scroll off the screen and a new blank line will be displayed at the bottom.
NOTE: The computer keeps a running total, Total, of the amounts you have disbursed (on the lower line of the screen) and the Difference, between this total and the Invoice Amt. entered, Invoice. The Difference should be 0.00 (the Invoice and Total amounts should match) when you have finished entering disbursements. It is very important that the invoice information is correct at this point. After the invoices are posted from the TEMPORARY INVOICE file to the OPEN PAYABLES file, information may not be corrected, adjustments will have to be entered.
Review the data you have entered (or changed) on the screens. If you wish to SAVE the information, click on the Save button on the Toolbar, pick the Save option from the File Menu, or press [Ctrl][S]. If you do NOT wish to save the information, click on the Cancel button on the toolbar, pick the Cancel option from the File Menu, or press [Ctrl][L].