B/P Income Maintenance
The B/P INCOME file stores your various sources of income. This option is used to initially enter the data in the B/P INCOME file and then to make changes to the values as needed.
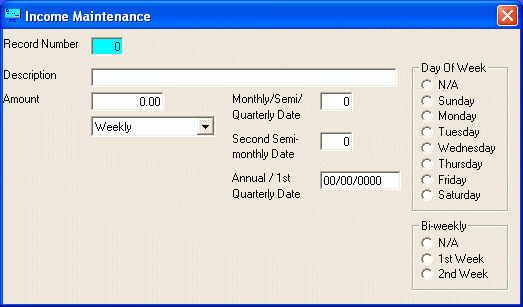
After selecting this option from the B/P Master File Maintenance Menu, the B/P Income Maintenance screen will be displayed as follows:
The Record Number is simply a way to identify each item.
The Description identifies where you derive this income.
Enter the Amount of this income.
Select Weekly, Bi-Weekly, Semi-Monthly, Monthly, Quarterly, or Annual, to identify how often you receive this income.
If Semi-Monthly, Monthly, or Quarterly is selected, enter the Monthly/Semi/Quarterly Date of the month when this income is received.
If Semi-Monthly is selected, enter the Second Semi-monthly Date of the month when this income is received.
If Annual is selected, enter the Annual / 1st Quarterly Date of the year when this income is received. If Quarterly is selected, in the Annual / 1st Quarterly Date field, enter the date (during the first quarter - January, February, March) when this income is received.
For example ... if you worked at ABC Corporation and brought home $401.63 each Friday, you would enter "ABC Corporation" in the Description, 401.63 in the Amount, set the drop-box to "Weekly", and mark "Friday" in the Day Of Week (the other items on the screen don't matter for weekly income). If you brought home $689.46 every other Thursday, you would set the drop-box to "Bi-weekly", mark "Thursday", and mark whether you would have received a check on Thursday of the 1st Week of the year or the 2nd Week under the Bi-weekly section. When you enter this option, the date of the first Friday of the year will be entered into the First Ending Date field and the Number Of Weeks will be calculated for you. These fields will not be editable (disabled) unless you mark the Manual Date box. You would mark this box and edit the 2 fields ONLY if you wish to choose a different week-ending day than Friday.
Review the data you have entered (or changed) on the screens. If you wish to SAVE the information, click on the Save button on the Toolbar, pick the Save option from the File Menu, or press [Ctrl][S]. If you do NOT wish to save the information, click on the Cancel button on the toolbar, pick the Cancel option from the File Menu, or press [Ctrl][L].