D/S Product Maintenance
This option is used to initially enter products into the PRODUCT MASTER file, add new products, or make changes as necessary to Product Master information currently existing in the file. The Product Master file is used to store all the relevant information on items that are sold on an invoice.
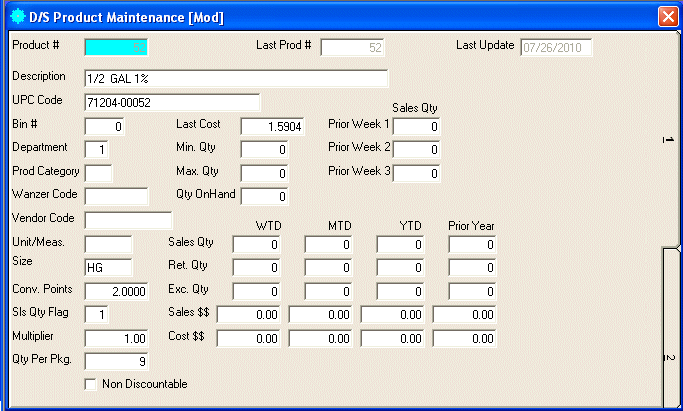
After selecting this option from the menu, the computer will display the Product Maintenance screen. as follows:

A) To add a new Product to the file, enter the unique Product Number that you are assigning to this product and press [TAB].
B) To view or change an existing Product's information, enter the Product Number of the product whose record you wish to change. If you wish to FIND the information, click on the Find icon on the Toolbar, pick the Find option from the Edit Menu, or press [Ctrl][F]. Upon entering a valid number, the computer will display the master information stored for this product. Make changes in the same manner you entered the data.
Enter the Remaining information on this screen as follows:
Enter the Description for this product.
Enter the UPC Code for this product.
Enter the Bin # where this product can be found.
Enter the Department for this product which will be used subtotal sales on different reports.
Enter the Product Category for this product which is used to categorize information on the D/S Daily Summary Sales By Product Category Report.
Enter the Wanzer Code for this product.
Enter a Vendor Code for this product.
Enter the Unit/Meas. (Unit Of Measure) for this product.
Enter the Size of this product. Since the size will be printed on the pre-printed invoice forms, this field should reflect the selling size.
Enter the Conv. Points (conversion points) that will be used for this product. These points will be multiplied by the quantity.
Enter the Sls Qty Flag (sales quantity flag) and Multiplier of this product.
Enter the Qty Per Pkg. (quantity per package) for this product.
If you check the Non-Discountable box, this product will NOT be discounted on your customer's invoice.
Enter the Last Cost that you were charged for this product from your vendor.
Enter the Minimum Quantity that should be in stock at any given time for this product
Enter the Maximum Quantity that should be in stock at any given time for this product.
The system will maintain the Qty OnHand (quantity on hand), Prior Week Sales Qty 1-3, WTD, MTD, YTD, and Prior Year Sales Qty, Ret. (return) Qty, Exc. (exchange) Qty, Sales $$, and Cost $$.
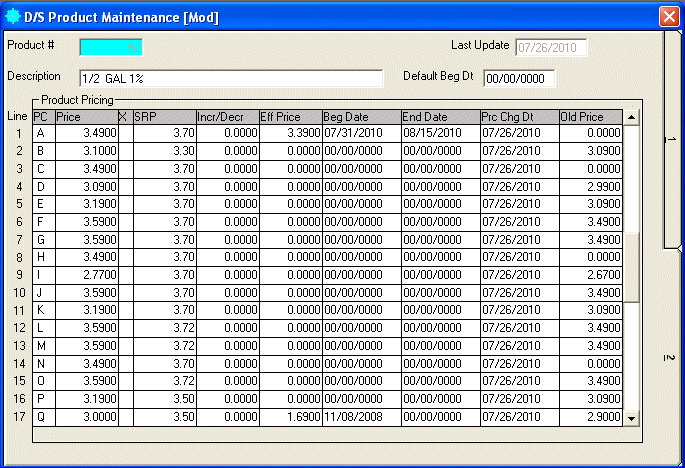
When you have finished entering data on the first screen, click on tab 2 or press [Alt][2] to display the second screen as follows:

The Default Beg Dt (default begin date) allows you to specify a beginning date to be filled in when you setup a new Eff Price (effective price) for the price codes.
Enter a detail line for each Price Code that has pricing for this product. Enter detail information as follows:
Enter the Price for this PC (price code).
If you mark the X field, that will tell the system that this price code is on sale.
Enter the SRP (suggested retail price) that you suggest your customers to sell this price code for.
Enter the Incr/Decr (increase/decrease) that you want to add (or subtract) from the price to calculate the effective price. (This is only used to calculate the effective price and does NOT get stored in the product file.)
Enter the Eff Price (effective price) for this price code.
Enter the Beg Date (begin date) and End Date for this price code. If the invoice entry date or pre-printed invoices date is greater than the begin date and less than the end date, then the system will use the effective price; otherwise the system will use the price. (If the end date is empty, then the end date is ignored and the invoice entry date or pre-printed invoices date needs to only be greater than the begin date for it to use the effective price.)
The system will maintain Prc Chg Dt (price change date) and Old Price for this price code. This field gets updated every time the price gets modified.
The Last Update field indicates the last time master information for this product was changed. The software will maintain this date.
Review the data you have entered (or changed) on the screens. If you wish to SAVE the information, click on the Save icon on the Toolbar, pick the Save option from the File Menu, or press [Ctrl][S]. If you do NOT wish to save the information, click on the Cancel icon on the toolbar, pick the Cancel option from the File Menu, or press [Ctrl][L].