Company Maintenance
The COMPANY file is a file containing general information about your company including dates to match to your fiscal periods. Since this file is accessed by many programs in the system, it is very important that the values entered here are correct and accurate so that the programs that use these values will execute properly and produce appropriate information. The COMPANY file should be set-up before beginning to enter information in the any module in the Team Software System.
The Company Maintenance option is initially used to set-up the COMPANY file and then to make changes in the file as needed. For the most part, this option will be used once a year to change the dates that define your Current Fiscal Periods.
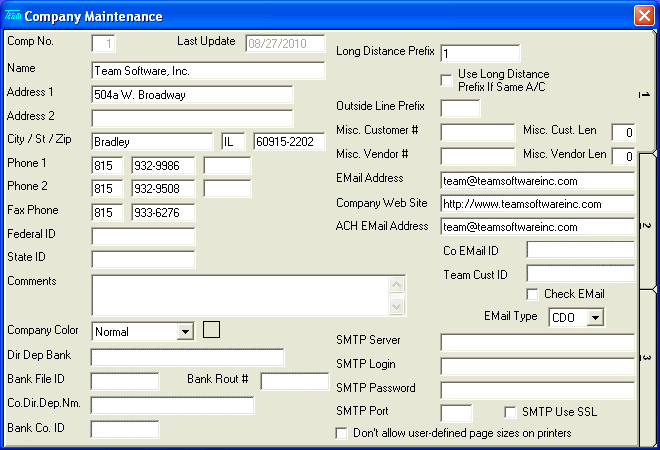
After selecting this option from the menu, the computer will display Screen 1 of the Company Maintenance program as follows:
Enter your Company Name (as you wish it to appear on report headings). Next enter your Address (1 & 2). Then, your City, State, and Zip Code.
Enter your area code, phone number (include the hyphen) and extension (and a secondary phone, if applicable) in the Phone (1 & 2). You may also enter the area code and phone number for your Fax Phone.
Enter your company's Federal ID and State ID Numbers. These will be used when printing Vendor 1099's in Accounts Payable and also in the Payroll module for W-2's.
You may enter any Comments you wish at this time.
If you wish to set a Company Color you may select one from the drop-down list.
If you will be using Direct Deposit or ACH functions, enter the Dir Dep Bank (Direct Deposit or ACH Bank Name), Bank File ID, Bank Rout # (Bank Routing Number), Co.Dir.Dep.Nm. (Company Direct Deposit Name), and Bank Co. ID (Bank Company ID).
Enter the Long Distance Prefix, Use Long Distance Prefix if Same A/C, and Outside Line Prefix. These fields will be used with the Phone Dial icon on the Toolbar. These fields work in the following manner the Outside Line Prefix will always be the first part of the phone number followed by a Long Distance Prefix (if the phone number has a different A/C or Use Long Distance Prefix if Same A/C is checked) followed by the phone number you are trying to call.
The Misc. Customer # (Miscellaneous Customer Number) identifies which prefix to use for various activities throughout the Team Software System pertaining to miscellaneous customers. The Misc. Cust. Length (Miscellaneous Customer Length) clearly identifies the length of that prefix. For example: you might enter "ZZZ" and 3 or "MISC" and 4 into these fields.
The Misc. Vendor # (Miscellaneous Vendor Number) identifies which prefix to use for various activities throughout the Team Software System pertaining to miscellaneous vendors. The Misc. Vendor Length (Miscellaneous Vendor Length) clearly identifies the length of that prefix. For example: you might enter "ZZZ" and 3 or "MISC" and 4 into these fields.
Enter your EMail Address, Company Web Site, and ACH EMail Address.
The Co EMail ID is a Payroll Employee ID that has been established with a password to be used for checking Company EMail if you indicate that you wish to Check EMail.
Enter your Team Cust ID (Team Software assigned Customer ID Number).
Select your EMail Type (CDO or MAPI). Enter your SMTP Server name, SMTP Login name, SMTP Password, SMTP Port number, and indicate if your SMTP server requires Secure Socket Layer (SMTP Use SSL). All of these fields pertain to the sending of EMail from within the Team Software System.
If your printer is of certain types, you may need to indicate that we Don't allow user-defined page sizes on printers.
When you have finished entering data on the first screen, click on tab 2 or press [Alt][2] to display the second screen as follows:
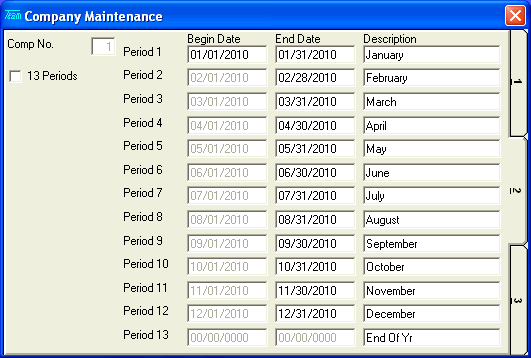
The fields on Screens 2 and 3 store information about fiscal periods. Two years of data should be entered, either last year and this year, or this year and next year.
If you run on a 12 period year, leave the 13 Periods field unchecked. If you run on a 13 period year, check this box.
Enter the Begin Date for your fiscal Period 1, followed by the End Date for your first fiscal period. The Begin Date for subsequent periods will be calculated and defaulted for you. Continue by entering the End Date and Description for all periods. This description will be used on some reports to better identify your fiscal period.
When you have finished entering data on the second screen, click on tab 3 or press [Alt][3] to display the third screen as follows:
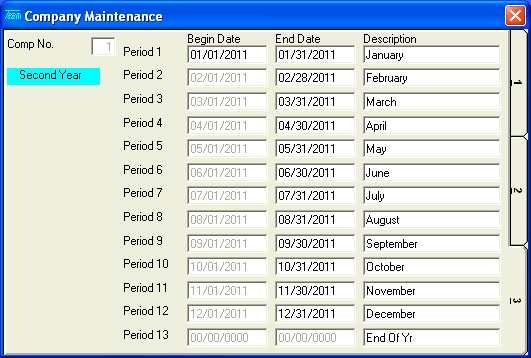
Enter data on this screen in the same manner as Screen 2.
Review the data you have entered (or changed) on the screens. If you wish to SAVE the information, click on the Save icon on the Toolbar, pick the Save option from the File Menu, or press [Ctrl][S]. If you do NOT wish to save the information, click on the Cancel icon on the Toolbar, pick the Cancel option from the File Menu, or press [Ctrl][L].