W/O Control Maintenance
This option is used maintain the Work Order CONTROL file.
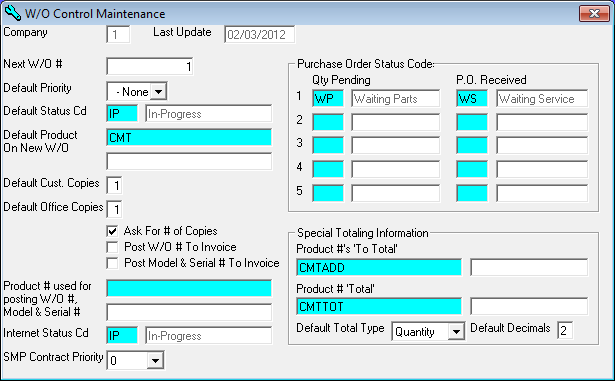
After selecting this option from the menu, the computer will display the W/O Control Maintenance screen. as follows:
Enter the information on this screen as follows:
Enter the Next W/O # (Work Order Number) that you wish system to create when a new work order is generated in the Work Order Maintenance program.
Enter the Default Priority that you wish the system to default on a new work order.
Enter the Default Status Cd (W/O Status Code) that you wish the system to default on a new work order. If you wish to FIND the information, click on the Find icon on the Toolbar, pick the Find option from the Edit Menu, or press [Ctrl][F]. Upon entering a valid code, the computer will display the description stored for the record.
Enter the Default Product On New W/O that you wish the system to default into the first 50 lines on a new work order. If you wish to FIND the information, click on the Find icon on the Toolbar, pick the Find option from the Edit Menu, or press [Ctrl][F]. Upon entering a valid number, the computer will display the description stored for the record.
The Default Cust. Copies (Customer Copies) is used to determine the # of work order copies that you wish to print for a customer.
The Default Office Copies is used to determine the # of work order copies that you wish to print as your office copy.
The Ask For # Of Copies box may be checked to allow you to enter the number of copies that you wish to print whenever you print a work order. If this is box is checked it will default the values from Default Cust. Copies and Default Office Copies described above.
The Post W/O # To Invoice box may be checked to indicate that you want the system to post the W/O Number to the invoice that it creates.
The Post Model & Serial # To Invoice box may be checked to indicate that you want the system to post the Model # and Serial # to the invoice that it creates.
Enter the Product # used for posting W/O #, Model #, & Serial # that you wish the system to use when you have the Post W/O # To Invoice or Post Model & Serial # To Invoice boxes checked. If you wish to FIND the information, click on the Find icon on the Toolbar, pick the Find option from the Edit Menu, or press [Ctrl][F]. Upon entering a valid number, the computer will display the description stored for the record.
Enter the Internet Status Cd (W/O Status Code) that you wish the system to default on a new internet-placed work order. If you wish to FIND the information, click on the Find icon on the Toolbar, pick the Find option from the Edit Menu, or press [Ctrl][F]. Upon entering a valid code, the computer will display the description stored for the record.
Select the SMP Contract Priority that you wish the system to default. You can display the available options by clicking this field with your mouse or scrolling through the list by using the up/down arrow keys.
You may enter up to five status codes to convert when a Work Order gets received in full by a tied Purchase Order. Enter this information as shown below:
Enter the Qty Pending Status Code that was assigned to the work order when the order was entered. If you wish to FIND the information, click on the Find icon on the Toolbar, pick the Find option from the Edit Menu, or press [Ctrl][F]. Upon entering a valid number, the computer will display the description stored for the record.
Enter the Qty Received Status Code that you wish the system to convert the work order to when all products that are tied to a Purchase Order are received. If you wish to FIND the information, click on the Find icon on the Toolbar, pick the Find option from the Edit Menu, or press [Ctrl][F]. Upon entering a valid number, the computer will display the description stored for the record.
You may enter Special Totaling Information to have the system automatically calculate descriptions that are entered by columns. Enter this information as shown below:
Enter the Product #’s ‘To Total’ which the system will use to determine which products will be totaled. If you wish to FIND the information, click on the Find icon on the Toolbar, pick the Find option from the Edit Menu, or press [Ctrl][F]. Upon entering a valid number, the computer will display the description stored for the record.
Enter the Product # ‘Total’ which the system will use to determine which product will receive the calculated total. If you wish to FIND the information, click on the Find icon on the Toolbar, pick the Find option from the Edit Menu, or press [Ctrl][F]. Upon entering a valid number, the computer will display the description stored for the record.
Enter the Default Total Type which the system will use to determine what type of total it will calculate. You can display the available options by clicking this field with your mouse or scrolling through the list by using the up/down arrow keys
Enter the Default Decimals which the system will use to determine how many decimals right of the decimal point display in the total.
Review the data you have entered (or changed) on the screens. If you wish to SAVE the information, click on the Save icon on the Toolbar, pick the Save option from the File Menu, or press [Ctrl][S]. If you do NOT wish to save the information, click on the Cancel icon on the toolbar, pick the Cancel option from the File Menu, or press [Ctrl][L].