A/D Drop-In Maintenance
This option is used to initially enter sizes into the DROP-IN AD file, add new ads, or make changes as necessary to DROP-IN AD information currently existing in the file.
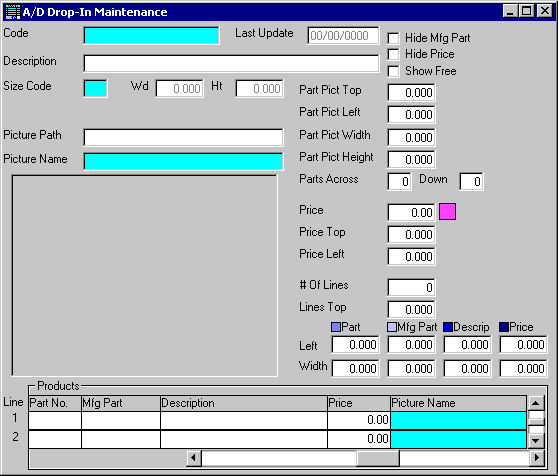
After selecting this option from the A/D Master File Maintenance Menu, the A/D Drop-In Maintenance screen will be displayed as follows:
A) To add a new Drop-In Ad to the file, enter the unique Code that you are assigning to this drop-in ad and press [TAB]. Size Categories can be up to 20 characters in length.
B) To view or change an existing Drop-In Ad's information, enter the Code of the drop-in ad whose record you wish to change, or Perform A Search to find a Drop-In Ad record. Upon entering a valid code, the computer will display the master information stored for this drop-in ad. Make changes in the same manner you entered the data.
Enter the remaining information on this screen as follows:
The Description identifies this Drop-In Ad.
Enter the Size Code or Perform A Search. Upon entering a valid code, the computer will display the Wd (width) and Ht (height) for this size code (in inches).
Enter the Picture Path and Picture Name fields. These allow you to specify the background picture file to be used in the A/D Ad Design Maintenance option (in the Picture Name field, you may Perform A Search to find one). Upon exiting the Picture Name field, a picture of the specified graphic will be displayed if these fields are entered properly.
Check the Hide Mfg Part box if you wish the manufacturer’s part number to be hidden from display in the A/D Ad Design Maintenance option.
Check the Hide Price box if you wish the price to be hidden from display in the A/D Ad Design Maintenance option.
Check the Show Free box if you wish the word “FREE!” to be displayed instead of the price in the A/D Ad Design Maintenance option.
The next six fields pertain to the parts/products entered into the grid on the bottom of the screen. The Part Pict Top and Part Pict Left specify the starting location (in inches) for displaying the pictures of the parts. The Part Pict Width, and Part Pict Height determine the width and height of EACH picture displayed. The Parts Across and Down determine the size of the picture “grid” to be displayed.
If you wish a default Price to be displayed (i.e. 99.99), you may specify that amount and the Price Top and Price Left (in inches) where it will be displayed. A colored area will be displayed as a place-holder.
Enter the # Of Lines (number of lines /parts) to be displayed followed by the Lines Top display location (in inches).
Enter the Left and Width for each of the following: Part, Mfg Part (manufacturer’s part number), Descrip (description), and Price. A colored area will be displayed as a place-holder.
In the Products grid, enter the Part No., Mfg Part (manufacturer’s part number), Description, Price. Enter the Picture Name of the part’s picture file (or Perform A Search to find one). Continue adding lines to the grid for all products pertaining to this Drop-In Ad. You may scroll the grid in all directions as necessary using the arrows to the right of the grid and beneath it.
Review the data you have entered (or changed) on the screen. If you wish to SAVE the information, click on the Save button on the Toolbar, pick the Save option from the File Menu, or press [Ctrl][S]. If you do NOT wish to save the information, click on the Cancel button on the toolbar, pick the Cancel option from the File Menu, or press [Ctrl][L].