Security System
The Security System allows you to define login names and passwords for each person who will use the software. By defining these logins/passwords, you can control who has access to specific areas of information. For instance, you may have one operator, Harry, who is responsible for entering all Purchase Order data and another operator, Jane, who is responsible for maintaining Accounts Payable data, but you do not want Harry to receive access to Accounts Payable. Follow the steps below to add a new login/password or change an existing login/password.
Invoke the program following the steps outlined in the Daily Start Up Procedures. Upon logging-in with a valid name and password that has the ability to "Modify Password File", (if you are entering logins/passwords for the first time, use the login name and password supplied to you by Team Software, Inc.), select the following option from the menu (Program => Master File Maintenance => Security Maintenance).
Once this option is selected from the menu the following screen will be displayed:
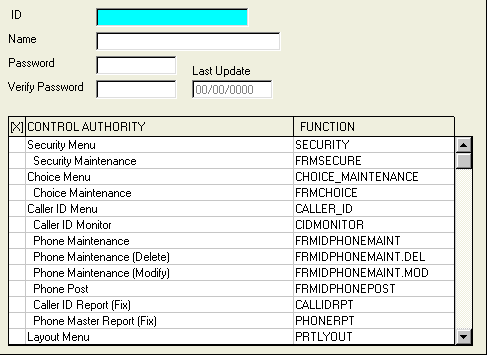
A) To add a new user to the system, enter the unique ID that you are assigning to this user and press [TAB]. IDs can be up to 8 characters in length.
B) To view or change an existing user's information, enter the ID of the user whose record you wish to change, or Perform A Search to find a user record. Upon entering a valid ID, the computer will display the master information stored for this user. Make changes in the same manner you entered the data.
Enter the Remaining information on this screen as follows:
Enter the Name of the person for which you are defining a password. The name may be entered in any form, for instance you could enter "Mary", or "Mary Jones" or "Jones, Mary". Ideally you should try to use the same format for all users when entering the Name (so it will be easier to remember when you wish to change a user's Password or access rights).
Enter the Password that you are assigning to this user. Passwords may be any combination of 1-8 characters (letters and/or numbers). Passwords are not case sensitive. Passwords entered will be displayed as asterisks (*) at all times, so that they may never be seen by anyone.
Re-enter the Password in the Verify Password field. This is to make sure that you typed it correctly.
Next, you will indicate to which options and menus this user will have access. When you press [Enter] or double-click any field on a particular line (option) an [X] or will be toggled on or off. If the line has an [X], that option or menu will be available to the user.
NOTE: An "X" next to the options "Security Menu" and "Security Maintenance", gives this user the ability to change passwords and access rights. It is very important that you give at least one user this ability, but also keep in mind that for security purposes, you should give only a limited number of users access to modify the password file.
Review the data you have entered (or changed) on the screens. If you wish to SAVE the information, click on the Save icon on the Toolbar, pick the Save option from the File Menu, or press [Ctrl][S]. If you do NOT wish to save the information, click on the Cancel icon on the toolbar, pick the Cancel option from the File Menu, or press [Ctrl][L].
Once you have set-up logins/passwords for all intended users, you can delete the original supplied login name. Enter that user name in the ID field and press [Tab].
NOTE: If you wish to delete this login/password, select the Delete option and confirm that you wish to permanently remove this record. DO NOT DELETE THE ORIGINAL LOGIN/PASSWORD UNTIL YOU HAVE ADDED A LOGIN/PASSWORD WITH ACCESS TO "Security Menu" and "Security Maintenance"!
When you are finished defining (or changing) passwords and access rights, exit the Security module.
NOTE: If a user attempts to select a module or option to which his/her login/password does not allow access, they will receive a message indicating that they do not have access.