P/R Employee Maintenance
This option is taken to initially create the EMPLOYEE MASTER file and then to add new employees or make changes to the file as necessary. Each employee record includes personal information, deductions, and default values that are used during payroll processing. An employee record must exist in this file before the employee can be included in the next payroll processing.
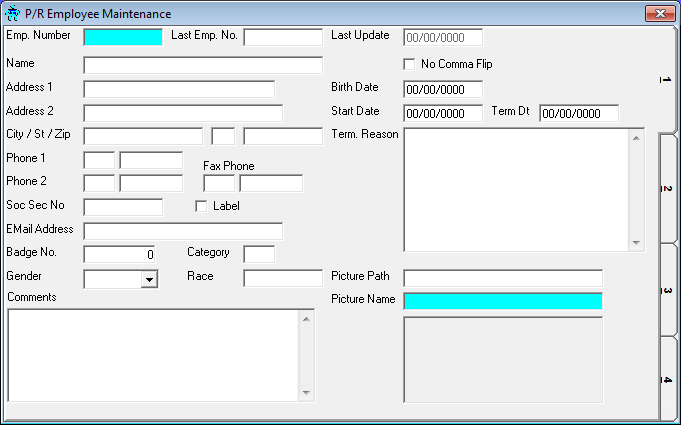
After selecting this option from the P/R Master File Maintenance Menu, the P/R Employee Maintenance screen will be displayed as follows:
A) To add a new record to the file, enter the unique Employee Number that you are assigning to this record and press [TAB].
B) To view or change an existing record's information, enter the Employee Number of the record you wish to change, or Perform A Search to find a record. Upon entering a valid number, the computer will display the master information stored for this record. Make changes in the same manner you entered the data.
Enter the Employee's Name by entering the last name first followed by a comma and then the first name. Entering the name in this manner will allow you to print a report of employees in alphabetical order by last name.
Check the No Comma Flip option if you do NOT want to flip the name on a comma as described above.
Enter the employee's Address, City, State, Zip Code, Phone 1, Phone 2, Fax Phone, and Social Security Number.
The Label box may be checked in order to mark the employee for a particular run of printing employee mailing labels.
Enter the employee's EMail Address, Badge No., and Category.
Enter the employee's Badge No. this may be used to print a badge with picture I.D.
Enter the employee's Category which is used to categorize employees within union rankings, such as journeyman, apprentice, etc.
Select the Gender of this employee (you may leave this blank if you are not required to store this information).
Enter a Race code. This field may be left blank.
Enter any Comments you wish to store for this employee.
Enter the employee's Birth Date and Start Date of employment with this company.
If you are terminating an employee, enter the Term Dt (termination date) and Term Reason (termination reason).
The Picture Path and Picture Name fields allow you to specify a logo-based bitmap file to be used when printing Employee Badges. A picture of the specified graphic will be displayed if these fields are entered properly.
When you have finished entering data on the first screen, click on tab 2 or press [Alt][2] to display the second screen as follows:
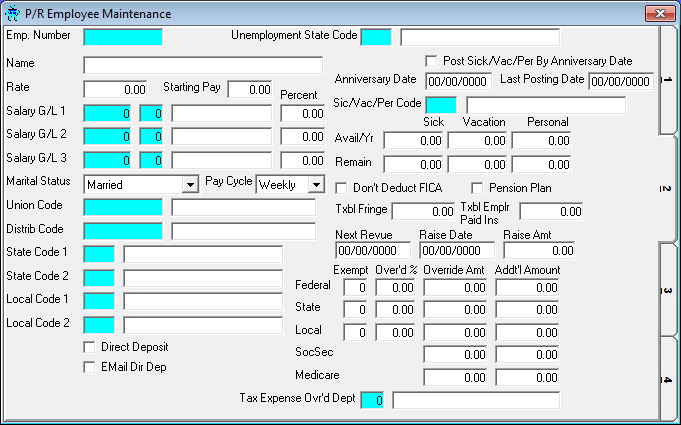
Enter the employee's Rate. If this employee is a salaried employee, enter the total salary amount; otherwise, enter the regular hourly rate.
When adding a new employee, the employee's Starting Pay will automatically be filled in.
If the employee's wages are based on a salary, enter the Salary G/L 1-3. This allows you to split the employee's Rate into three different G/L accounts by entering the G/L Account Number and Department, or Perform A Search to find a record, and enter a percentage.
Select the employee's Marital Status as one of the following:
S = Single M = Married H = Head of Household
Select one of the following to indicate which Pay Cycle should be used:
W = Weekly B = Bi-weekly S = Semi-monthly M = Monthly H = Half-annually A = Annually
If the employee belongs to a union, enter the Union Code (or Perform A Search to find one).
If you are using distributions, enter the Distribution Code (or Perform A Search to find one) that applies to this employee. If not, leave this field blank. Hours entered for this employee will be applied to this distribution, unless the Distribution Code is changed during Timecard Maintenance.
Enter the State Code 1 (or Perform A Search to find one), this should be the state from which SIT (State Income Taxes) are withdrawn for this employee. Leave the State Code 2 field blank. If an employee moves to a different state in the middle of a year and taxes are to be deducted for the second state rather than the first, enter the new code in the State Code 2 field.
Enter the Local Code 1 (or Perform A Search to find one) if this employee is required to have local income taxes withheld from their check. Leave the Local Code 2 field blank. If an employee moves to a different locality in the middle of a year and taxes are to be deducted for the second locality rather than the first, enter the new code in the Local Code 2 field.
Check the Direct Deposit check box if this employee wishes to receive their paycheck deposited directly into their bank.
Check the EMail Dir Dep (Email Direct Deposit) check box if this employee wishes to receive an email of their check stub, instead of a printed copy of their check stub. This is option is only available if the employee has checked the Direct Deposit check box.
Enter the Unemployment State Code (or Perform A Search to find one), this should be the state where the employee works.
Check the Post Sick/Vac/Per By Anniversary Date check box if you want the Sick/Vacation/Personal time to be renewed based upon the employee's anniversary date rather than the end of the calendar year.
Enter the Anniv. Dt (Anniversary Date) for this employee. This is usually the Start Date and is only available when the Post Sick/Vac/Per By Anniversary Date check box is checked.
The Last Posting Date will be automatically updated by the system. This date indicates the last date that this employee's Sick/Vacation/Personal hours were updated and is only used when the Post Sick/Vac/Per By Anniversary Date check box is checked.
Enter the Sic/Vac/Per Code (Sick/Vacation/Personal Code) (or Perform A Search to find one), if you are using the SICK/VACATION/PERSONAL MASTER FILE to determine each employees' sick/vacation/personal time instead of the P/R CONTROL FILE.
Enter the Sick, Vacation, and Personal hours Avail/Yr (available per year) for this employee. For example, if the employee may have 12 Sick Days, you would enter 96 hours (12 days x 8 hours per day).
Next, enter the Sick, Vacation, and Personal hours Remain (remaining) for this employee this year. These fields will be updated by the computer when an Hours Code whose Sick/Vacation/Personal field contains a value of sick, vacation, or personal is entered in Timecard Maintenance.
Check the Don�t Deduct FICA check box if FICA taxes are NOT to be deducted for this employee.
If the employee is covered by your Pension Plan, check the Pension Code option box.
Enter the Txbl Fringe (Taxable Fringe) and Txbl Emplr Paid Ins (Taxable Employer Paid Insurance) for this employee. These amounts will be printed on this employee's W-2.
If applicable, enter the Next Revue date, Raise Date, and Raise Amt.
Enter the amount of Federal Exemptions. You may enter any number between 0 and 99, with 99 indicating exempt from Federal tax.
NOTE: When calculating exemptions for a Married employee, the computer assumes 1 exemption at the Personal amount (from the STATE MASTER file), 1 exemption at the Spouse amount, and the remaining exemptions at the Dependent amount.
Leave the Over'd % (override percentage) field blank. If you wish to disregard any percentage in the STATE TAX file or the graduated TAX TABLE file, enter the percentage with which you wish the FIT (Federal Income Tax) to be calculated in the Over'd % field.
Leave the Override Amt field blank. If you wish to disregard any percentage in the STATE TAX file or the graduated TAX TABLE file, enter the amount of FIT (Federal Income Tax) to be withheld in the Override Amt field.
If the employee would like an additional amount deducted from each check for Federal tax, enter the amount in the Addtn'l Amt field.
Follow the guidelines of Federal Exemptions for the State Exempt, Over'd %, Override Amt, and Addtnl Amt fields.
Follow the guidelines of Federal Exemptions for the Local Exempt, Over'd %, Override Amt, and Addtnl Amt fields.
If you wish to disregard the tax that is calculated for SocSec (social security), enter the amount of social security to be withheld in the Override Amt field.
If the employee would like an additional amount deducted from each check for social security, enter the amount in the Addtn'l Amt field.
Follow the guidelines of SocSec for the Medicare Override Amt, and Addtnl Amt fields.
If you want the employee's tax expenses to be assigned to a different department, enter the Tax Expense Ovr'd Dept (or Perform A Search to find one).
When you have finished entering data on the second screen, click on tab 3 or press [Alt][3] to display the third screen as follows:
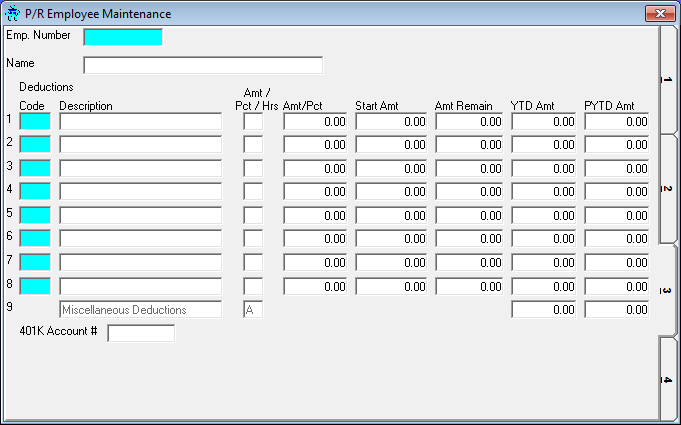
If applicable, enter the Deduction Code (or Perform A Search to find one) for deductions other than Federal, State and Local taxes. After entering a valid deduction, the Description and Amt/Pct/Hrs will be displayed for verification.
Next enter the Amt/Pct that you wish to be deducted. The deduction will be calculated as follows:
Amt/Pct/Hrs = "A" - Amount
Amt/Pct/Hrs = "P" - Percentage of gross pay
Amt/Pct/Hrs = "H" - An hourly rate which will be multiplied by the total hours
If the deduction is temporary (at some point in time it will no longer be taken; for example, paying back a loan or a court ordered wage garnishment) and you know the total amount that will be deducted, enter that total starting amount in the Start Amt field. Next, enter the Amt Remain (when you are entering a new deduction, the Amt Remain will be the same as the Start Amt). The amount remaining will be updated by the computer during payroll processing and the deduction will no longer be taken once the Amt Remain reaches zero.
The YTD Amt field will also be updated by the computer during payroll processing.
The PYTD Amt field will also be updated by the computer during payroll year-end zeroing.
NOTE: Miscellaneous, one-time, deductions do not have to be set up here. You may enter one-time deductions during Timecard Maintenance.
If this employee is enrolled in a 401k plan, enter their 401K Account #.
When you have finished entering data on the third screen, click on tab 4 or press [Alt][4] to display the fourth screen as follows:
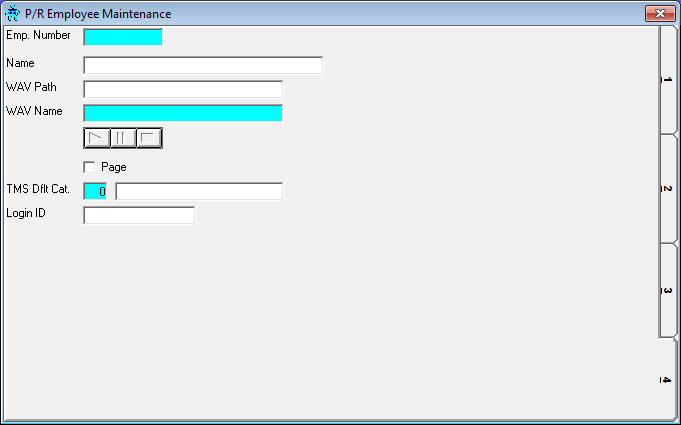
The WAV Path and WAV Name fields allow you to specify a wave file to be used to associate a unique sound or message with this employee.
If this employee has a pager, check the Page check box.
If you are using the timesheet system (which is available through Special Utilities 2), enter the TMS Dflt Cat. (Timesheet Default Category) (or Perform A Search to find one).
Enter the Login ID that this employee uses to sign into the Team Software system.
Review the data you have entered (or changed) on the screens. If you wish to SAVE the information, click on the Save button on the Toolbar, pick the Save option from the File Menu, or press [Ctrl][S]. If you do NOT wish to save the information, click on the Cancel button on the toolbar, pick the Cancel option from the File Menu, or press [Ctrl][L].