P/R Timecard Maintenance
This option is used to enter the hours worked for each employee during the current pay period. The specific Hours Codes entered for each employee will determine how Gross Pay is calculated. Hours must be entered for each employee who is to receive a check, regardless if their pay is based on an hourly rate or salary. Note that even if you intend to print manual checks, hours must still be entered here for all payroll files to be updated properly.
During setup, each Hours Code may have been associated with a particular Workers’ Comp and Distribution code. Therefore, the hours code entered here will determine how those files are updated and how those costs (for the employer) will be calculated. In addition, Miscellaneous, one-time deductions may be entered.
It is very important that you verify that the Check Posting has been completed for the previous pay period before entering new timecards. Failure to do so will allow previously printed checks to appear on the Check Register and check numbers may be incorrect.
After selecting this option from the P/R Processing Menu, the P/R Timecard Maintenance screen will be displayed as follows:
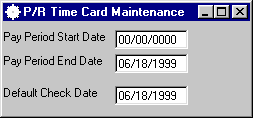
Enter the Pay Period Start Date, Pay Period End Date, and Default Check Date.
You may Accept this information or Cancel the program. If you Accept, the screen will be displayed as follows:
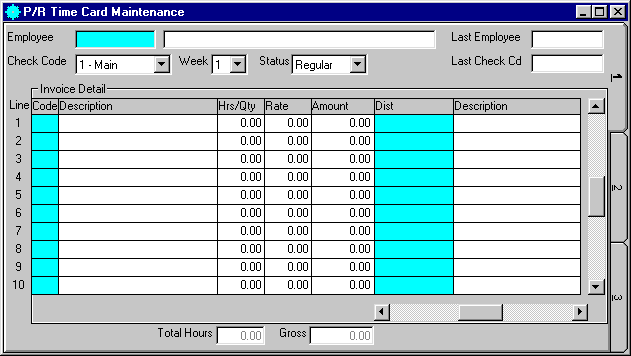
A) To add a new record to the file, enter the Employee Number and Check Code that you are assigning to this record and press [TAB].
B) To view or change an existing record's information, enter the Employee Number and Check Code of the record you wish to change, or Perform A Search to find a record. Upon entering a valid number, the computer will display the information stored for this record. Make changes in the same manner you entered the data.
The Check Code field is used to allow you to enter hours so that you may print more than one check for an employee in the same pay period.
If you have entered hours on a previous screen, so that an employee is already receiving one check, and wish to enter hours for another check for the same employee, enter a 2 in the Check Code field. This indicates to the computer that the information you are about to enter is to be on another check. You may give an employee up to 5 checks during a pay period.
If you have already posted checks and need to back out or void a check, you may enter Void in the Status field. Continue by entering the same hours information you entered for the check you are voiding, so that all the files will be updated correctly for the voided check. (If you wish to print a new check, you would next have to input new hours to print the new check.) Do not use this Void option unless you have to void a check and make corrections or delete the check.
The next portion of the screen is for entering the detailed hours information. You may enter as many Hours Codes as necessary for each employee/check combination.
Enter the Hours Code. When you enter an Hours Code, the description for that code will be displayed for verification. What you will need to enter in the remaining fields for this detail line will depend on the type and specific Hours Code you entered.
A) When you set up Hours Codes (on the P/R Master File Maintenance Menu), you indicated if the code was either Salary/Hours/Amount. If the hours code you entered was a Salary type, the cursor will skip over the Rate and Amount fields.
If the code you entered was an Hours type, enter the number of hours worked applicable to this code. The Rate for the employee will be displayed (from the EMPLOYEE MASTER file). You may override the Rate only if you checked the Override on Emp. Rate option box when setting up this hours code.
If the code you entered was an Amount type, enter the Amount.
NOTE: The only way to enter a specific amount for a check (or for a specific number of hours) is to use an Hours Code that was set up as an Amount type.
B) The cursor will only stop on these fields, G/L No, Dpt (department), and WrkCmp if you checked the override prompts for these fields when setting up this hours code. If the cursor does stop on any of these fields, the description for the particular code in that field will be displayed for verification.
C) If applicable, enter the Dist. codes for these hours. When entering distributions, the description for the codes will be displayed for verification.
D) NOTES:
1) For a salaried employee that you are tracking Sick and/or Vacation Hours Remaining, you must enter an Hours Code. This is so that the Sick and Vacation Hrs Remaining are updated properly in the EMPLOYEE MASTER file. For instance, if an employee was sick one day you would enter 8 hours with an hours type code that is defined as sick and then 32 hours under an hours type code that is defined as regular. His/her Gross Pay will still be calculated correctly based on his/her salary (Salary / Weeks per paid period / Hours in a Week).
2) To enter hours for some type of bonus check, enter an Hours Code that is an Amount type hours code that has the ability to override the description field. Then, enter the Description.
When you have finished entering data on the first screen, click on tab 2 or press [Alt][2] to display the second screen as follows:

If there are deductions setup in the EMPLOYEE MASTER file, these deductions will be displayed in the top 8 deductions. Follow these steps for each of these deductions
If the Amt/Pct/Hrs is equal to P, the percent that was setup in the EMPLOYEE MASTER file will be defaulted in Pct/Hourly, enter a different percent if necessary. The computer will automatically recalculate the Amount.
If the Amt/Pct/Hrs is equal to H, the hourly rate that was setup in the EMPLOYEE MASTER file will be defaulted in Pct/Hourly, enter a different rate if necessary. The computer will automatically recalculate the Amount.
If the Amt/Pct/Hrs is equal to A, the amount that was setup in the EMPLOYEE MASTER file will be defaulted in Amount, enter a different amount if necessary.
If you have a one-time deduction for this timecard, you may enter the Description and Amount for this deduction on the 9th (or Miscellaneous Deduction) line.
When you have finished entering data on the second screen, click on tab 3 or press [Alt][3] to display the third screen as follows:
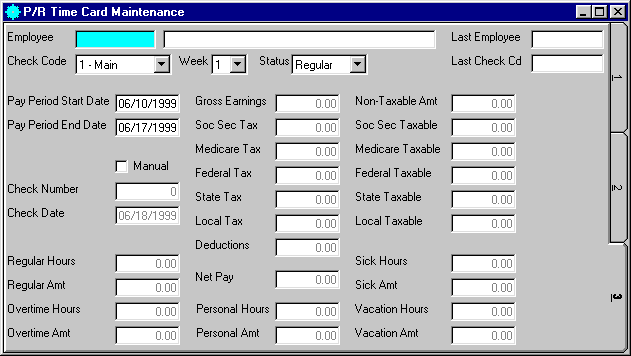
This screen displays all the totals that the computer has calculated for this check. You may change the Pay Period Start Date and Pay Period End Date if these are different from the other checks in this batch.
If this is a manual check, click the Manual check box and the following fields will be enabled so that you can fill this information in:
Enter the Check Number and Check Date for this manual check.
Next enter the Soc Sec Tax, Medicare Tax, Federal Tax, State Tax, and Local Tax for this manual check.
If you want to calculate time from a time card, you may click on tab 4 or press [Alt][4] to display the fourth screen as follows:
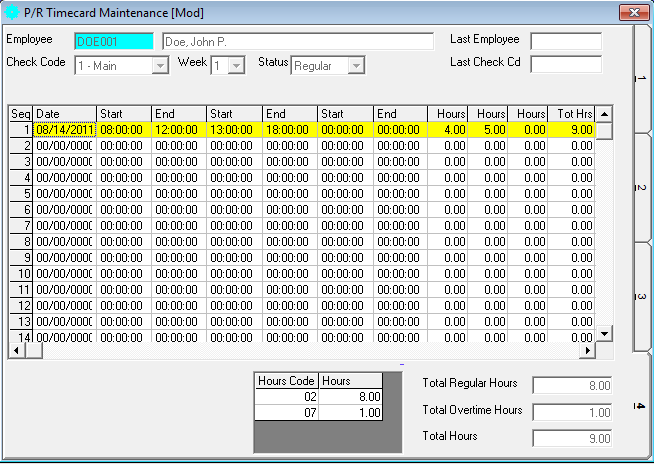
This screen is used to calculate regular and overtime hours from a manual time card. It allows up to 3 different start and end times and displays totals at the bottom as well as a total grid that is broken down by hours codes.
To add or edit a line on the time sheet grid, double-click the line that you wish to add or edit and the following screen will appear:
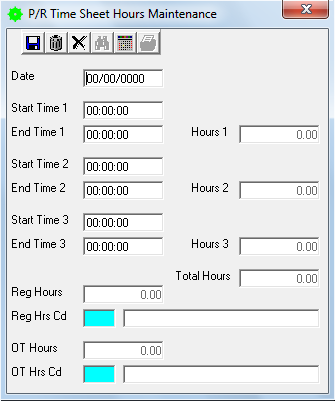
Enter the Date that is on the time card.
Enter up to 3 different Start Times and End Times. The computer will calculate the Hours 1, Hours 2, Hours 3, Total Hours, Reg Hours, and OT Hours.
If you want to separate the hours by hours code, enter the Reg Hrs Cd, or Perform A Search to find a record, that you wish to assign to the regular hours. If there were overtime hours calculated, enter the OT Hrs Cd, or Perform A Search to find a record, that you wish to assign to the overtime hours.
Select the Save button on the Toolbar to save your changes to this detail line. If you select save this will put this data onto the time sheet grid. If you do NOT wish to save the information click on the Cancel button.
Review the data you have entered (or changed) on the screens. If you wish to SAVE the information, click on the Save button on the Toolbar, pick the Save option from the File Menu, or press [Ctrl][S]. If you do NOT wish to save the information, click on the Cancel button on the toolbar, pick the Cancel option from the File Menu, or press [Ctrl][L].