P/R Recurring Timecard Maintenance
This option is used to enter the hours worked for each employee as a default for all pay periods. The specific Hours Codes entered for each employee will determine how Gross Pay is calculated. Hours must be entered for each employee who is to receive a check, regardless if their pay is based on an hourly rate or salary. Note that even if you intend to print manual checks, hours must still be entered here for all payroll files to be updated properly.
During setup, each Hours Code may have been associated with a particular Workers’ Comp and Distribution code. Therefore, the hours code entered here will determine how those files are updated and how those costs (for the employer) will be calculated.
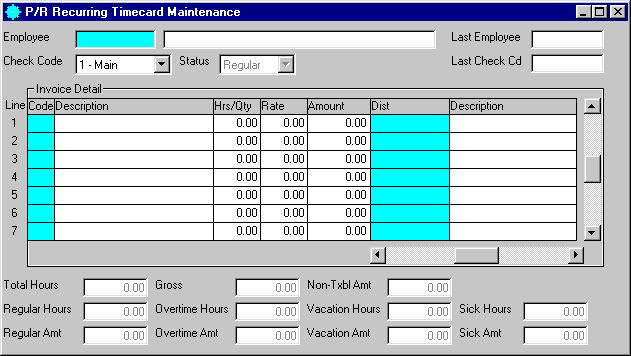
After selecting this option from the P/R Processing Menu, the P/R Recurring Timecard Maintenance screen will be displayed as follows:

A) To add a new record to the file, enter the Employee Number and Check Code that you are assigning to this record and press [TAB].
B) To view or change an existing record's information, enter the Employee Number and Check Code of the record you wish to change, or Perform A Search to find a record. Upon entering a valid number, the computer will display the information stored for this record. Make changes in the same manner you entered the data.
The Check Code field is used to allow you to enter hours so that you may print more than one check for an employee in the same pay period.
If you have entered hours on a previous screen, so that an employee is already receiving one check, and wish to enter hours for another check for the same employee, enter a 2 in the Check Code field. This indicates to the computer that the information you are about to enter is to be on another check. You may give an employee up to 5 checks during a pay period.
The next portion of the screen is for entering the detailed hours information. You may enter as many Hours Codes as necessary for each employee/check combination.
Enter the Hours Code. When you enter an Hours Code, the description for that code will be displayed for verification. What you will need to enter in the remaining fields for this detail line will depend on the type and specific Hours Code you entered.
A) When you set up Hours Codes (on the P/R Master File Maintenance Menu), you indicated if the code was either Salary/Hours/Amount. If the hours code you entered was a Salary type, the cursor will skip over the Rate and Amount fields.
If the code you entered was an Hours type, enter the number of hours worked applicable to this code. The Rate for the employee will be displayed (from the EMPLOYEE MASTER file). You may override the Rate only if you checked the Override on Emp. Rate option box when setting up this hours code.
If the code you entered was an Amount type, enter the Amount.
NOTE: The only way to enter a specific amount for a check (or for a specific number of hours) is to use an Hours Code that was set up as an Amount type.
B) The cursor will only stop on these fields, G/L No, Dpt (department), and WrkCmp if you checked the override prompts for these fields when setting up this hours code. If the cursor does stop on any of these fields, the description for the particular code in that field will be displayed for verification.
C) If applicable, enter the Dist. codes for these hours. When entering distributions, the description for the codes will be displayed for verification.
Review the data you have entered (or changed) on the screens. If you wish to SAVE the information, click on the Save button on the Toolbar, pick the Save option from the File Menu, or press [Ctrl][S]. If you do NOT wish to save the information, click on the Cancel button on the toolbar, pick the Cancel option from the File Menu, or press [Ctrl][L].