This option is taken to initially create the CUSTOMER MASTER file and then to add new customers or make changes as necessary to customers currently existing in the file.
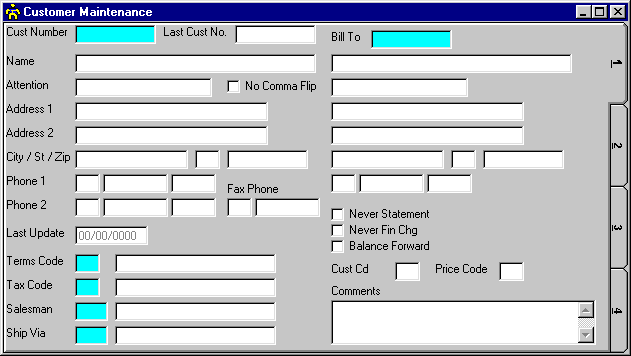
After selecting this option from the A/R Master File Maintenance Menu, the computer will display the Customer Maintenance screen as follows:
A) To add a new Customer to the file, enter the unique Cust Number (customer number) that you are assigning to this customer (or leave the Cust Number blank to have the system assign a new number) and press [TAB]. Customer Numbers can be up to 10 characters in length (Customer Numbers starting with "ZZZZZZZ" are reserved for use as Miscellaneous Customers).
B) To view or change an existing Customer's information, enter the Cust Number (customer number) of the customer whose record you wish to change, or Perform A Search to find a Customer record. Upon entering a valid number, the computer will display the master information stored for this Customer. Make changes in the same manner you entered the data.
Enter the Remaining information on this screen as follows:
If the Customer is an individual person, enter their last Name first followed by a comma, and then their first name. For example, to enter "John Smith", you would enter “Smith, John” so that you may find this record under the letter “S” for “Smith”. If the customer is a business firm, enter the company name (i.e., "K M Printing, Inc.")
NOTE: Customer names are entered in this manner in order to sort the file by name in alphabetical order. Therefore, you may wish to enter company names such as "The Computer Co." as “Computer Co., The” (if you wish this company to appear under "C" as opposed to "T").
No Comma Flip, if marked, causes businesses (like “K M Printing, Inc.”) to print to “K M Printing, Inc.” instead of “Inc. K M Printing”
Attention allows you to enter an individual or department to which invoices for this customer should be directed.
The Address (1 and 2), City, State, and Zip Code should be entered.
Phone (1 and 2) consist of a 3 character area code, 8 character phone number (be sure to include the hyphen if you wish to see it), and a 5 character extension number.
Fax Phone consists of a 3 character area code and an 8 character phone number (be sure to include the hyphen if you wish to see it).
The Last Update field indicates the last time master information for this vendor was changed. The software will maintain this date.
Enter the Terms Code for your normal payment terms for this Customer, or Perform A Search to find a Terms Code record. Upon entering a valid code, the computer will display the description stored for the record.
Enter the Tax Code for your normal invoices for this Customer, or Perform A Search to find a Tax Code record. Upon entering a valid code, the computer will display the description stored for the record.
Enter the Salesman for your normal salesman for this Customer, or Perform A Search to find a Salesman record. Upon entering a valid code, the computer will display the description stored for the record.
Enter the Ship Via for your normal shipping to this Customer, or Perform A Search to find a Ship Via record. Upon entering a valid code, the computer will display the description stored for the record.
The Bill To Customer number is designed for customers with a shipping address different than their mailing address. If the customer has a special Bill To Address, enter the Cust Number of the Bill To customer here. If the customer does not have a special billing address, the Bill To number should be the same as the Cust Number of this Customer record. You may Perform A Search to find a Bill To record.
If you want this Customer to be able to receive statements, leave the Never Statement option box unchecked. If you want this Customer to be able to receive finance charges for past due balances, leave the Never Finance Charge option box unchecked. If you want this Customer to be an “Open Item” Customer (statements will show all unpaid invoices) instead of “Balance Forward” (like most credit card statements – shows a previous balance and new invoices only), leave the Balance Forward option box unchecked.
Enter the Cust Cd (Customer code), Price Code, and any Comments that you want for this Customer.
When you have finished entering data on the first screen, click on tab 2 or press [Alt][2] to display the second screen as follows:
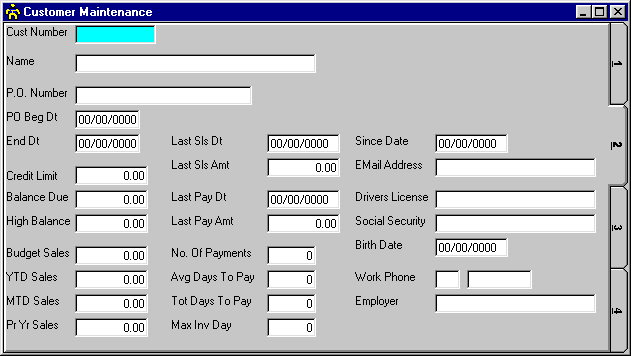
If the Customer has an open P.O. Number with you, enter that number. Also, enter the P.O. Beg Dt (begin date) and P.O. End Dt (end date).
Enter the Credit Limit for this Customer. The system will maintain the Balance Due and High Balance fields. Budget Sales (expected sales to the Customer) may be entered. The system will maintain the YTD Sales, MTD Sales, PrYr (Prior Year) Sales, Last Sls Dt (Last Sales Date), Last Sls Amt (Last Sales Amount), Last Pay Dt (Last Payment Date), Last Pay Amt (Last Payment Amount), No. (Number) Of Payments, Avg Days To Pay (average days that it has taken the Customer to pay), Tot Days To Pay (total days that it has taken the Customer to pay), and Max Inv Day (maximum days that it has taken the Customer to pay).
Enter the Since Date for this Customer (the date the customer started doing business with you). You may also enter the Customer’s EMail Address, Drivers License number, Social Security number, Birth Date, Work Phone, and Employer.
When you have finished entering data on the second screen, click on tab 3 or press [Alt][3] to display the third screen as follows:
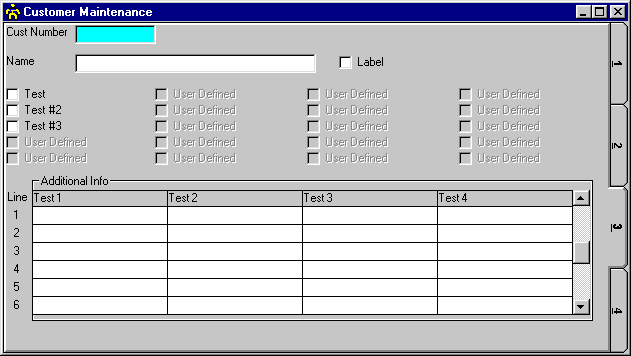
The Label box may be checked in order to mark the Customer for a particular run of printing Customer mailing labels.
You may check any of the User Defined option boxes you set up in the A/R Control File Maintenance program. You may also enter any of the 4 user-defined Additional Info fields you set up in the A/P Control File Maintenance program.
When you have finished entering data on the third screen, click on tab 4 or press [Alt][4] to display the fourth screen as follows:

The Label Picture Path and Label Picture Name fields allow you to specify a logo-based bitmap file to be used when printing Customer mailing labels. A picture of the specified graphic will be displayed if these fields are entered properly.
D/S Dairy Sales Customer Screen (5)
W/C Water Control Customer Screen (5)
Review the data you have entered (or changed) on the screens. If you wish to SAVE the information, click on the Save button on the Toolbar, pick the Save option from the File Menu, or press [Ctrl][S]. If you do NOT wish to save the information, click on the Cancel button on the toolbar, pick the Cancel option from the File Menu, or press [Ctrl][L].