W/O Work Order Maintenance
This option is used to view or change Work Orders.
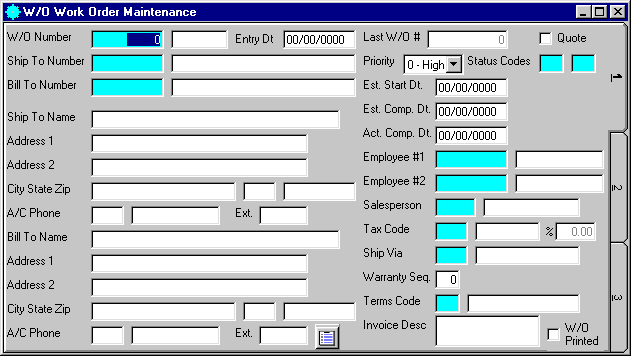
After selecting this option from the menu, the computer will display the W/O Work Order Maintenance screen as follows:
Enter the information on this screen as follows:
A) To add a new work order, leave the Work Order number blank for the system to assign the next available work order number or enter an unused Work Order number. The system will default the Entry Date to the system date, the Priority, Status Code, and the first 50 Product Numbers will be defaulted to the values setup in B/I CONTROL file.
B) To view or change an existing Work Order, enter the Work Order Number of the Work Order you wish to change. If you wish to FIND the information, click on the Find icon on the Toolbar, pick the Find option from the Edit Menu, or press [Ctrl][F]. Upon entering a valid number, the computer will display the information stored for this work order. Make changes in the same manner you entered the data.
Enter the Ship To Number (Ship To Customer Number) for this invoice. If you wish to FIND the information, click on the Find icon on the Toolbar, pick the Find option from the Edit Menu, or press [Ctrl][F]. Upon entering a valid number, the computer will display the name and address, and default the Bill To Number stored for the record. The computer will also default the SalesPerson, Tax Code, Ship Via, and Terms Code stored in the Bill To Customer’s record. You can also enter a miscellaneous customer number (miscellaneous customers begin with “ZZZZZZZ”), if this work order is for a one time customer that you do not wish to store in the CUSTOMER MASTER file. Miscellaneous customers allow you to key in the name and address. If you wish to add a new customer, modify an existing customer, or default the last customer number edited in the customer maintenance program, click on the Customer Options icon on the Toolbar, or pick the Customer Options from the User Defined Menu.
Enter the Bill To Number (Bill To Customer Number) for this work order. If you wish to FIND the information, click on the Find icon on the Toolbar, pick the Find option from the Edit Menu, or press [Ctrl][F]. Upon entering a valid number, the computer will display the name and address, and default the SalesPerson, Tax Code, Ship Via, and Terms Code stored in the Bill To Customer’s record. If you wish to add a new customer, modify an existing customer, or default the last customer number edited in the customer maintenance program, click on the Customer Options icon on the Toolbar, or pick the Customer Options from the User Defined Menu.
![]()
The Display Comments (Bill To Customer) button allows you to display the customer comments field. Click this button, or press [Ctrl][F2] to display the Customer Comments screen.
Enter the Priority of this work order. You can display the available options by clicking this field with your mouse or scrolling through the list by using the up/down arrow keys.
Enter the Status Code(s) for this work order. If you wish to FIND the information, click on the Find icon on the Toolbar, pick the Find option from the Edit Menu, or press [Ctrl][F]. Upon entering a valid number, the computer will display the name stored for the record. These fields are used to display what status of the work order. The second status code is used when this work order contains products that have not been received in inventory. An example of this might be:
Status Code 1 is WP (Waiting Parts) which will be changed to the
Status Code 2 which is WS (Waiting Service) when the parts are received.
Enter the Est. Start Date (Estimated Start Date), Est. Comp. Date (Estimated Completion Date), and Act. Comp. Date (Actual Completion Date), of this work order.
Enter the Employee #1 and Employee #2 responsible for working on this work order. If you wish to FIND the information, click on the Find icon on the Toolbar, pick the Find option from the Edit Menu, or press [Ctrl][F]. Upon entering a valid number, the computer will display the name stored for the record.
Enter the SalesPerson responsible for this sale. If you wish to FIND the information, click on the Find icon on the Toolbar, pick the Find option from the Edit Menu, or press [Ctrl][F]. Upon entering a valid number, the computer will display the name stored for the record.
Enter the Tax Code for this work order. If you wish to FIND the information, click on the Find icon on the Toolbar, pick the Find option from the Edit Menu, or press [Ctrl][F]. Upon entering a valid code, the computer will display the description and tax percent stored for the record. This field will be used to calculate sales tax.
Enter the Ship Via for this work order. If you wish to FIND the information, click on the Find icon on the Toolbar, pick the Find option from the Edit Menu, or press [Ctrl][F]. Upon entering a valid code, the computer will display the description stored for the record.
Enter the Warranty Seq for this work order (if applicable). This field is used to identify a work order as a warranty work order, which is used to track warranty work, relieve inventory, and post sales tax due for your company. (If there is a value entered in this field, the customer will not be billed.)
Enter the Terms Code for this work order. If you wish to FIND the information, click on the Find icon on the Toolbar, pick the Find option from the Edit Menu, or press [Ctrl][F]. Upon entering a valid code, the computer will display the description stored for the record. This field is used to setup the due dates for this work order.
Enter the Invoice Desc (description) for this invoice. This field will be posted to the ACCOUNTS RECEIVABLE files and displayed on appropriate reports and Customer Statements.
The W/O Printed box may be checked to indicate that this work order has already been printed.
Enter the Entry Date for this work order (if different than the default).
The Quote box may be checked to indicate that this is only a quote. Work Orders that have the quote box checked will not allocate quantity and you will not be able to post this work order to an invoice.
When you have finished entering data on the first screen, click on tab 2 or press [Alt][2] to display the second screen as follows:
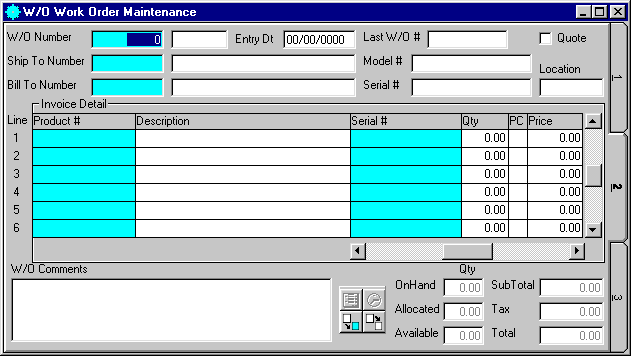
Enter the Model #, Serial #, and Location of the item to be worked on (if applicable).
Enter a detail line for each Product that you wish to appear on this work order. Enter invoice detail information as follows:
Enter the Product # that you wish to sell. If you wish to FIND the information, click on the Find icon on the Toolbar, pick the Find option from the Edit Menu, or press [Ctrl][F]. Upon entering a valid number, the computer will default the Description, PC (Price Code) from the customer file, and Price. If the product is an inventory item, the computer will display the quantity OnHand, quantity Allocated, and quantity Available for this product.
Enter the Description for this line (if applicable).
Enter the Serial # for this line (if applicable). If you wish to FIND the information, click on the Find icon on the Toolbar, pick the Find option from the Edit Menu, or press [Ctrl][F]. If the Serial # that you wish to sell does not exist in the computer, you may key ‘UNKNOWN’ into this field, and correct this serial # at a later date.
Enter the Qty (Quantity) that you wish to sell for this line.
Enter the PC (Price Code) for this line. This field is used to determine what price this customer and product will receive.
Enter the Price for this product. The Extended price will be automatically calculated.
If this product is a Rebill Product and you wish to rebill this line, enter the Rebill Inv # (Rebill Invoice Number) that you wish to rebill. If this field is filled in, the system will automatically create an invoice using the rebill invoice # that you entered and the rebill information setup in the PRODUCT MASTER file when this work order is converted to an invoice, and that invoice is posted. (To get to this field you must scroll the Invoice Detail box to the right by using the scroll bar below this detail section.)
If this product is a Backout Product and you wish to backout this line, mark the BkOut? (Backout) box. You may toggle this selection by pressing the spacebar or double-clicking the mouse. If this field is filled in, the system will automatically backout a portion of this amount, and assign this amount to the backout product # setup in the PRODUCT MASTER file when this work order is converted to an invoice, and that invoice is posted. (To get to this field you must scroll the Detail box to the right by using the scroll bar below this detail section.)
If you do not have sufficient quantity of this product to fill this work order, enter a value in the POQty (Purchase Order Quantity) field. You can then tie this work order to a purchase order, so that when the tied purchase order is received, this field (POQty) will be updated. Once this field equals zero, this line will be ready to be invoiced. (To get to this field you must scroll the Detail box to the right by using the scroll bar below this detail section.)
If you wish to partially bill this work order, you can uncheck the Post? box. If this box has an ‘X’ (default value) this line will post when the work order gets posted to an invoice, if this box has a [SPACE] this line will NOT post when work order gets posted to an invoice. You may toggle this selection by pressing the spacebar or double-clicking the mouse. (To get to this field you must scroll the Detail box to the right by using the scroll bar below this detail section.)
If this work order has already been posted and you wish to display the Invoice #’s, scroll the Detail box to the right by using the scroll bar below this section.
Enter the W/O Comments for this work order. (These comments will not be posted to an invoice.)
There are special buttons on this screen (located on the right hand side of the W/O Comments) to perform the following functions:
![]()
The Special Totals button allows you to calculate totals in the description field. Click this button, or press [Ctrl][F7] to display the Special Totals screen.
![]()
The Calculate Time button allows you to calculate time. Click this button, or press [Shift][F7] to display the Calculate Time screen.
![]()
The Post To Invoice button allows you to post this work order to an invoice (the Actual Completion Date must be filled in before this option is allowed). When you click this button, or press [Ctrl][O], this work order will be posted to an invoice.
![]()
The Post To History button allows you to post this work order to history without creating an invoice. When you click this button, or press [Ctrl][Y], this work order will be posted to history.
When you have finished entering data on the second screen, click on tab 3 or press [Alt][3] to display the third screen as follows:
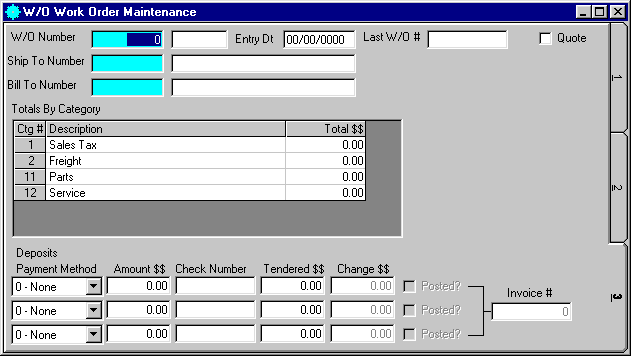
This screen shows the totals broken down by total category. These totals are for display only and no editing is allowed.
If the customer made a deposit for this work, enter a payment method for each payment that the customer uses for this deposit. Enter each deposit as follows:
Enter the Payment Method for this deposit. You can display the available options by clicking this field with your mouse or scrolling through the list by using the up/down arrow keys.
If a credit card payment method was chosen, the Credit Card Information screen will be displayed for editing.
Enter the Amount to be paid with this payment method.
Enter the Check Number used for this payment method (only allows input if the payment method is a check).
Enter the Cash Tendered for this payment method and the computer will calculate the change the customer will receive (only allows input if the payment method is cash).
![]()
If you wish to OPEN the Cash Drawer, click the Open Cash Drawer icon (shown above) on the Toolbar, pick the Open Cash Drawer option on the User Defined Menu, or press [Alt][C]. (This option is only available when you have a cash drawer attached to your computer.)
Review the data you have entered (or changed) on the screens. If you wish to SAVE and PRINT the invoice, click on the Print icon on the Toolbar, pick the Print option from the File Menu, or press [Ctrl][P]. If you wish to SAVE the information, click on the Save icon on the Toolbar, pick the Save option from the File Menu, or press [Ctrl][S]. If you do NOT wish to save the information, click on the Cancel icon on the toolbar, pick the Cancel option from the File Menu, or press [Ctrl][L].