A/P Recurring Invoice Maintenance
This option is used to initially enter invoices into the RECURRING INVOICE file, add new recurring invoices, and make changes to existing recurring invoices. Recurring invoices may be entered for invoices for which each payment is the same, or for any type of payment for which you pay a Principal and Interest (and Escrow) amount.
By entering recurring invoices for these types of payments, new invoices do not have to be entered into the TEMPORARY INVOICE file each time the invoice is due. Instead, the Recurring Invoice Posting option is used and unnecessary data entry is eliminated.
ADVANCED USER NOTE:
Recurring invoices may also be entered for invoices that you pay on a regular basis but on which the amount varies. For instance, you probably pay a phone bill on a monthly basis but the amount of the bill differs each month. You could enter a recurring invoice for the phone bill using some arbitrary amount. Then, after the recurring invoice is posted to the TEMPORARY INVOICE file each month, you could call up the phone bill invoice ( through Temporary Invoice Maintenance) and change the amount. You will have to be careful to remember to change the amount each time, but by using recurring invoices in this way, you eliminate having to enter an entirely new invoice each month.
When using recurring invoices in this manner, be aware of the Batch Numbers you assign to the invoices. Be careful not to post the TEMPORARY INVOICE file for these Batch Numbers until you have adjusted all invoice amounts.
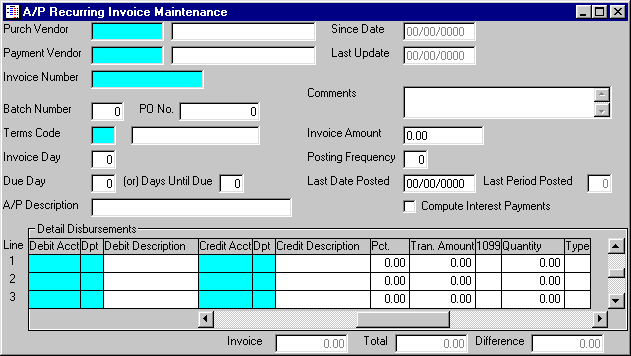
After selecting this option from the A/P Processing Menu, the screen will appear as follows:
A) To enter a new recurring invoice, enter the Purch Vendor (Purchase Vendor Number) to whom the recurring invoice is to be made, or Perform A Search to find a Vendor, followed by the Payment Vendor (this will default when you enter the Purch Vendor). Again, you may Perform A Search to find a Vendor. Next, enter the Invoice Number which you are assigning to this recurring invoice.
B) To change an existing recurring invoice, enter the the Purch Vendor (Purchase Vendor Number), Payment Vendor, and Invoice Number of the invoice you wish to change. Upon entering valid numbers, the remaining information will be displayed. Make changes in the same manner in which you entered the recurring invoice.
C) If you do not need this recurring invoice any longer, you may Delete this record (recurring invoice) from the RECURRING INVOICE file.
Enter the Batch Number for posting this invoice. If applicable, enter a P.O. Number. Enter the Terms Code for this invoice, or Perform A Search to find a TERMS CODE record. Upon entering a valid code, the computer will display the description stored for the record.
Next, enter the Invoice Day. The computer will use this day to assign the Invoice Date when the recurring invoice is posted to the TEMPORARY INVOICE file. For instance if you enter the Invoice Day as "01", when the recurring invoice is posted for June of 1999, the Invoice Date assigned would be "06/01/1999".
Enter the Due Day. Again, the computer will use this day to assign the Invoice Due Date in the same manner as described above. If a Due Day is entered, it will override the Days Until Due.
Enter the Days Until Due. The computer will use this to calculate the Invoice Due Date. If a Due Day is entered, it will override the Days Until Due.
Enter the A/P Description as the description you wish to appear on the Accounts Payable invoice. You may also enter Comments for this recurring invoice to further describe it. These Comments will not be posted to the TEMPORARY INVOICE file, only the A/P Description will be posted.
Enter the Invoice Amount that will be due each payment. Enter the Posting Frequency to indicate how often you wish the invoice to be posted to the TEMPORARY INVOICE file - 1 = every month, 2 = every 2 months, 3 = every 3 months, etc.
The Last Date Posted indicates the last time the invoice was posted to the TEMPORARY INVOICE file. Leave this field blank when entering a new recurring invoice. The computer uses this date to determine when to post the invoice to the TEMPORARY INVOICE file. The Last Period Posted will be displayed.
If the recurring invoice you are entering has Principal and Interest, check the Compute Interest Payments option box.
Enter the detail disbursement information in these fields in the same manner as if you were entering an invoice into the TEMPORARY INVOICE file. Refer to the Temporary Invoice Maintenance option if you are unsure.
If you checked the Compute Interest Payments option box, you will need to enter the following additional fields for each detail line (you will need to use the horizontal scroll bar to reach these fields):
On the line with Type “Prin” (Principal), enter the Current Amt (amount of principal remaining) and the Starting Amount (the original amount of Principal which you are repaying). (If you have not yet made a payment, the Current Amt and Starting Amount should be identical.)
On the line with Type “Int” (Interest), enter the Int. % (interest percentage) of the loan.
If you have other amounts associated with this payment (i.e. Escrow), enter a line for these amounts.
Based on the information entered, each time the invoice is posted to the TEMPORARY INVOICE file, the computer will calculate the Principal and Interest amounts and set-up the G/L Disbursement Detail lines for each, along with any additional amounts.
Review the data you have entered (or changed) on the screens. If you wish to SAVE the information, click on the Save button on the Toolbar, pick the Save option from the File Menu, or press [Ctrl][S]. If you do NOT wish to save the information, click on the Cancel button on the toolbar, pick the Cancel option from the File Menu, or press [Ctrl][L].