D/S Invoice Form Maintenance
This option is used to initially enter invoice forms into the INVOICE FORM MASTER file, add new invoice forms, or make changes as necessary to Invoice Form Master information currently existing in the file. The Invoice Form Master file is used to setup what the pre-printed invoices will look like which are printed from the D/S Pre-Printed Invoices program.
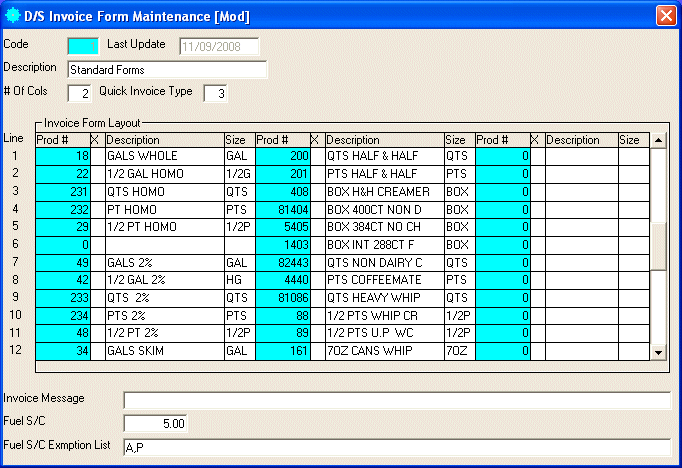
After selecting this option from the menu, the computer will display the Invoice Form Maintenance screen. as follows:

A) To add a new invoice form to the file, enter the unique Code that you are assigning to this invoice form and press [TAB].
B) To view or change an existing Invoice Form's information, enter the Code of the invoice form whose record you wish to change. If you wish to FIND the information, click on the Find icon on the Toolbar, pick the Find option from the Edit Menu, or press [Ctrl][F]. Upon entering a valid code, the computer will display the master information stored for this invoice form. Make changes in the same manner you entered the data.
Enter the Remaining information on this screen as follows:
Enter the Description for this invoice form.
Enter the # Of Cols (number of form columns) that will be printed on the invoice form. Each form column consists of a product number, X, description, and size.
Enter the Quick Invoice Type that you wish to use for the invoice form (at the time of this printing there were six different types).
Enter a detail line for each line that you wish to print on this invoice form. Enter detail information as follows:
Enter the Prod # (product number) (or Perform A Search to find one). The description and size will be defaulted.
If you mark the X field, the pre-printed invoice will underline the price area if the Print Price On Pre-Printed Invoice is NOT marked in the D/S Customer Maintenance. Based on what quick invoice type you selected this may also underline other empty fields on the invoice.
Enter the Description that you wish to print on the invoice form.
Enter the Size that you wish to print on the invoice form.
If you entered more than one form column in the # Of Cols listed above, please enter the Prod #, X, Description, and Size in the same manner for each remaining form column.
If you wish to insert a row into the form
column that you are in, push the Insert Row Into Current Column ![]() button (or press Shift+F3).
button (or press Shift+F3).
If you wish to delete a row into the form
column that you are in, push the Delete Row From Current Column  button (or press Shift+F4).
Enter the Invoice Message that you wish to print on the invoice forms.
If you want to assess a fuel surcharge, enter the Fuel S/C for this invoice form.
If you want any price codes to be EXEMPTED from the fuel surcharge that you entered above, enter these price codes (separated by a comma) in the Fuel S/C Exemption List and all the customers that contain these exempted price codes will NOT be charged a fuel surcharge.
The Last Update field indicates the last time master information for this invoice form was changed. The software will maintain this date.
Review the data you have entered (or changed) on the screens. If you wish to SAVE the information, click on the Save icon on the Toolbar, pick the Save option from the File Menu, or press [Ctrl][S]. If you do NOT wish to save the information, click on the Cancel icon on the toolbar, pick the Cancel option from the File Menu, or press [Ctrl][L].