G/I Factor Maintenance
This option is taken to initially create the FACTOR MASTER file and then to add new codes or make changes as necessary to codes currently existing in the file.
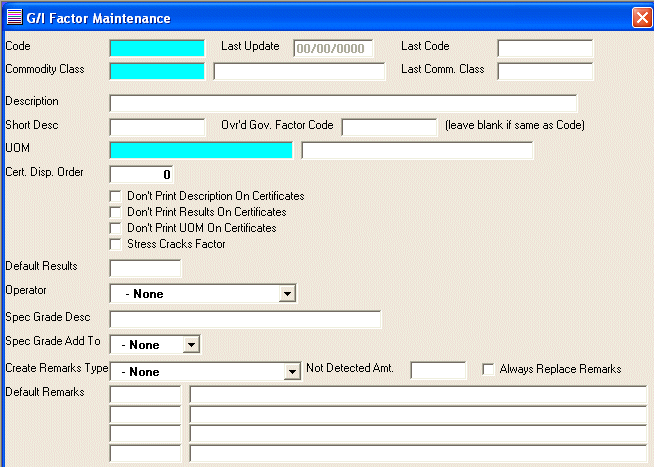
After selecting this option from the G/I Master File Maintenance Menu, the computer will display the Factor Maintenance screen as follows:
A) To add a new Factor Code to the file, enter the new, unused Factor Code and Commodity Class (you may leave the Commodity Class blank if this factor applies to all commodity classes) that you are assigning and press [TAB].
B) To view/change an existing Code's information, enter the Factor Code and Commodity Class of the record you wish to change, or Perform A Search to find a Factor Code record. After entering a valid Code, the information stored for that code will be displayed.
Enter the Description for this factor.
Enter the Short Description for this factor which will be displayed in the grade code maintenance and the submitted and official maintenance programs.
If the Factor Code is different than the government code required for this factor, enter the Ovr'd Gov. Factor Code.
Enter the UOM (Factor Unit Of Measure) (or Perform A Search to find one). The description will be displayed for verification.
Enter the Cert. Disp. Order which determines the order the factors will be displayed on the certificate.
If you do NOT want to print the Description on the certificate, mark the Don't Print Description On Certificates checkbox.
If you do NOT want to print the Results on the certificate, mark the Don't Print Results On Certificates checkbox.
If you do NOT want to print the Unit Of Measure on the certificate, mark the Don't Print UOM On Certificates checkbox.
If this factor is used to measure Stress Cracks, mark the Stress Cracks Factor checkbox.
Enter the Default Results which will be automatically defaulted into the results.
Select a value for Operator which is used to determine how to grade this factor.
GE - Greater Than Or Equal To If the factor result is Greater Than Or Equal To the results in the Grade Code file the factor results will be eligible for the grade.
GT - Greater Than If the factor result is Greater Than the results in the Grade Code file the factor results will be eligible for the grade.
LE - Less Than Or Equal To If the factor result is Less Than Or Equal To the results in the Grade Code file the factor results will be eligible for the grade.
LT - Less Than If the factor result is Less Than the results in the Grade Code file the factor results will be eligible for the grade.
Enter the Spec Grade Desc which will be added to the beginning (or end) of the Type Of Grain field in the official and submitted certificates.
If you have entered a Spec Grade Desc, select a value for Spec Grade Add To which is used to determine where to add the Special Grade Description.
P - Prefix This will add the Special Grade Description to the beginning of the Type Of Grain.
S - Suffix This will add the Special Grade Description to the end of the Type Of Grain.
Select a value for Create Remarks Type which is used to determine what type of remarks will be generated.
1 - Description + Equation + Result + UOM This option will add the Description, Equation, Result, and Unit Of Measure together and put this information into the remarks field. The Equation will be substituted with other words when the following symbols are encountered:
<= gets changed to equal to or less than
< gets changed to does not exceed,
> gets changed to exceeds
(i.e. In Submitted Samples Maintenance and Official Samples Maintenance under the Additional Factors section If the Description is Aflatoxin and the Results is <=10 and the Results is ppb the system will create Remarks of Aflatoxin equal to or less than 10 ppb.)
2 - Default Remarks This option will allow the user to choose from up to four Default Remarks.
3 - Automatic Remarks This option is used in the predefined factors to automatically replace the remarks for that factor with the first Default Remarks.
If the Create Remarks Type of 1 - Description + Equation + Result + UOM was selected, enter the Not Detected Amt. This field will work in the following manner, if the Equation + Result are equal to the value in this field then the system will substitute the Equation + Result + UOM with the words not detected
If you want to always use the remarks that the system generated for this factor without being able to edit them, mark the Always Replace Remarks checkbox.
Enter up to four Default Remarks.
The Last Update field indicates the last time master information for this record was changed. The software will maintain this date.
Review the data you have entered (or changed) on the screen. If you wish to SAVE the information, click on the Save button on the Toolbar, pick the Save option from the File Menu, or press [Ctrl][S]. If you do NOT wish to save the information, click on the Cancel button on the toolbar, pick the Cancel option from the File Menu, or press [Ctrl][L].