G/I Submitted Samples Maintenance
This option is used to initially enter submitted samples into the SUBMITTED SAMPLES file, add new submitted samples, and make changes to existing submitted samples.
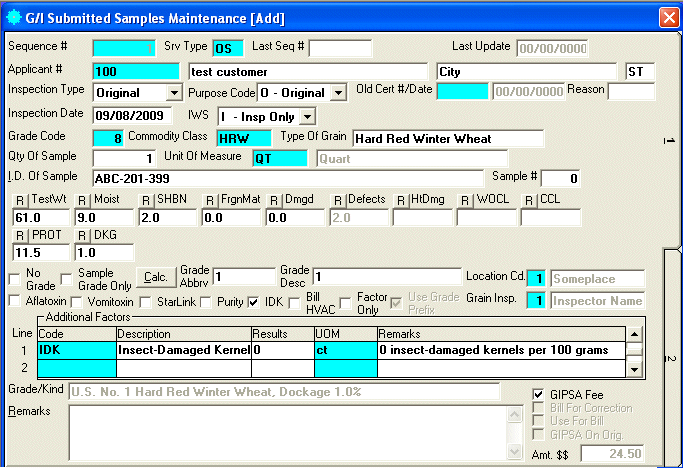
After selecting this option from the G/I Processing File Maintenance Menu, the computer will display the G/I Submitted Samples Maintenance screen as follows:
Enter the information on this screen as follows:
A) To add a new submitted sample, leave the Sequence number blank (if Don't Allow Zero Sequence Codes checkbox is NOT marked in the G/I Control File Maintenance) for the system to assign the next available sequence number or enter an unused Sequence number. The system will default the Inspection Date to the system date and the Srv Type (Service Type) will be defaulted to the value setup in G/I Control File Maintenance.
B) To view or change an existing submitted sample, enter the Sequence Number (or Perform A Search to find one) of the submitted sample you wish to change. Upon entering a valid sequence number, the computer will display the information stored for this submitted sample. Make changes in the same manner you entered the data.
Enter the Srv Type (Service Type) (or Perform A Search to find one). Upon entering a valid service type the computer will default IWS (Inspection Weighing Service), Grade Code, Qty Of Sample, Unit Of Measure, GIPSA Fee, Printed, and Posted To IDW stored in the Service Type's record.
Enter the Applicant # (or Perform A Search to find one). Upon entering a valid applicant # the computer will default applicant's Name, City, and State stored in the applicant's Customer record.
Enter the Name, City, and State of the applicant, if different than the defaulted values.
Select the appropriate Inspection Type and Purpose Code for this sample.
If the Inspection Type is a Reinspection or the Purpose Code is a Corrected Certificate, enter the Old Cert # (Old Certificate #) (or Perform A Search to find one) of the original sample that you wish to be re-inspected or corrected. Upon entering the Old Certificate #, if the old certificate # already exists, the program will ask "Do you wish to default the information from the old certificate number?". If you answer "Y", the information from the original sample will be defaulted into this new sample, and you will only need to change the information that needs to be changed; otherwise you will need to fill in all the information manually. Next enter the Old Certificate Date of the original sample. If this was a re-inspection, the computer will create the following statement in the remarks "This certificate supersedes certificate No. US-XX-#-#####, dated MM/DD/YYYY. Reinspection based on file sample. Other criteria results are those of original inspection service."
If the Purpose Code is a Corrected Certificate, enter the Reason. The computer will create the following statement in the remarks "This certificate is corrected as to xxxxxx and supersedes certificate No. US-XX-#-##### dated MM/DD/YYYY."
Enter the Inspection Date for this sample (if different than the default).
Select the IWS (Inspection and Weighing Service) for this sample.
I - Insp Only Your agency only did the inspection on this sample and no weighing.
W - Weigh Only Your agency only did weighing of this sample and no inspection.
IW - Insp & Wgh Your agency did weighing and inspection of this sample.
Enter the Grade Code (or Perform A Search to find one). Upon entering a valid grade code the computer will default Commodity Class and Type Of Grain stored in the Grade Code record. It will also setup the factors used for this Grade Code.
Enter the Commodity Class (or Perform A Search to find one) (if different than the default). Upon entering a valid commodity class the computer will default the Type Of Grain.
Enter the Type Of Grain (if different than the default).
Enter the Qty Of Sample (if different than the default).
Enter the Unit Of Measure (or Perform A Search to find one) that applies to the Qty Of Sample. Upon entering a valid Unit Of Measure the computer will display the description.
Enter the I.D. Of Sample for this sample.
Enter the Sample # for this sample. This is a user assigned number that is used to further define the sample. This number will NOT go to IDW and can be duplicated on other submitted samples.
Enter the Factor Results
for this sample. There are predefined factor codes assigned to
each grade code. In the example shown above, the Grade Code of 8
contains the following factors TestWt, Moist, SHBN, FrgnMat,
Dmgd, Defects, HtDmg, WOCL, CCL, PROT,
and DKG. If one of the Factor Results is disabled, it was
setup in Grade Code Maintenance to
calculate automatically. Additionally each factor has a button that
looks like this  .
This button is used to add a remark to the predefined factor. (Example
- FrgnMat is 0.3% and is made up of 0.1% Rye and 0.2% Barley and the customer
requires this breakdown on the certificate. To do this you would enter 0.3
in the factor results for FrgnMat and then you would click the
button that is left of the factor heading (FrgnMat) and fill into the
remarks popup screen Foreign Material Includes 0.1% of Rye and 0.2% of
Barley.)
.
This button is used to add a remark to the predefined factor. (Example
- FrgnMat is 0.3% and is made up of 0.1% Rye and 0.2% Barley and the customer
requires this breakdown on the certificate. To do this you would enter 0.3
in the factor results for FrgnMat and then you would click the
button that is left of the factor heading (FrgnMat) and fill into the
remarks popup screen Foreign Material Includes 0.1% of Rye and 0.2% of
Barley.)
If this does not get a grade and is NOT a Factor Only, mark the No Grade checkbox. (DO NOT CHECK THIS BOX IF THIS IS A FACTOR ONLY SAMPLE.) (Example - You have a sample of Yellow Corn that only needs an aflatoxin test and no other factor needs to be tested.)
If this is a sample grade only, mark the Sample Grade Only checkbox. If the Grade Abbrv and Grade Desc are empty, when you exit the Sample Grade Only field, these values will be automatically filled in. You may also click the Calc. button to calculate the results for Grade Abbrv and Grade Desc.
Enter the Grade Abbrv and Grade Desc of this sample, if different than the calculated values.
If this sample requires an aflatoxin test, mark the Aflatoxin checkbox. After clicking this checkbox, the Aflatoxin Factor Code which was setup in the Control File Maintenance will be defaulted into the Additional Factors section. You should fill this information in as described in the Additional Factors section shown below.
If this sample requires a vomitoxin test, mark the Vomitoxin checkbox. After clicking this checkbox, the Vomitoxin Factor Code which was setup in the Control File Maintenance will be defaulted into the Additional Factors section. You should fill this information in as described in the Additional Factors section shown below.
If this sample requires a starlink test, mark the StarLink checkbox. After clicking this checkbox, the Starlink Factor Code which was setup in the Control File Maintenance will be defaulted into the Additional Factors section. You should fill this information in as described in the Additional Factors section shown below.
If this sample requires a purity statement, mark the Purity checkbox. After clicking this checkbox, the Purity Message which was setup in the Control File Maintenance will be defaulted into the Remarks.
If this sample requires an IDK (Insect-Damaged Kernels) test, mark the IDK checkbox. After clicking this checkbox, the IDK Factor Code which was setup in the Control File Maintenance will be defaulted into the Additional Factors section. You should fill this information in as described in the Additional Factors section shown below.
If you wish to bill for Hard And Vitreous Kernels Of Amber Color, mark the Bill HVAC checkbox.
If this is a factor only sample, mark the Factor Only checkbox.
The computer will automatically mark and un-mark the Use Grade Prefix checkbox.
Enter the Location Cd. (or Perform A Search to find one) of the office that performed the analysis of the sample. Upon entering a valid Location Code the computer will display the description.
Enter the Grain Insp. (Grain Inspector) (or Perform A Search to find one) that performed the analysis of the sample. Upon entering a valid Grain Inspector Code the computer will display the name.
Enter a detail line for each Additional Factor that is required for this sample. Enter detail information as follows:
Enter the Code (or Perform A Search to find one) of the factor that was tested. Upon entering a valid Factor Code the computer will default the Description and UOM (Unit Of Measure).
Enter the Results for this factor.
Enter the UOM (Unit Of Measure) (or Perform A Search to find one) for this factor.
Enter the Remarks
for this factor. Based on the factor, this field might already be filled
in. If this is a factor that contains more than one default or has
parameters and Remarks field is empty or you push the Default Remarks  button (or press Alt+F5), the following screen will appear:
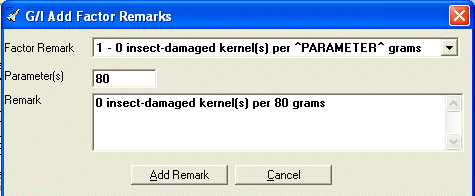
Select a user defined Factor Remark and enter any Parameter(s) that this remark requires. Once the Remark looks the way you want it, click the Add Remark button and this will replace the Remarks for this factor.
The computer will automatically fill in Grade/Kind.
Enter the Remarks
for this sample. If you wish to default pre-defined remarks,
push the Add Standard Remarks  button (or press Ctrl+F3) and the following screen will appear.
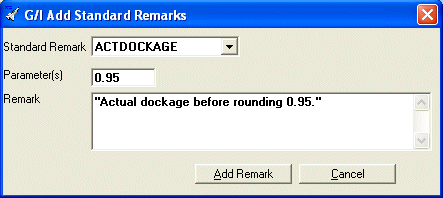
Select a user defined Standard Remark and enter any Parameter(s) that this remark requires. Once the Remark looks the way you want it, click the Add Remark button and this will replace the Remarks for this sample.
If this sample requires a GIPSA fee (used for computing government supervision or administrative tonnage fees), mark the GIPSA Fee checkbox.
If this sample has a Purpose Code of V - Corrected and you wish to bill for this correction, mark the Bill For Correction checkbox. (Example - The billing correction was caused by the customer supplying you with information that was NOT correct.) (This will not display if you have marked the Don't Show Bill Correction checkbox in the Control File Maintenance.)
If this sample has a Purpose Code of V - Corrected and you wish to use the corrected certificate for billing instead of the old certificate, mark the Use For Bill checkbox.
If the Use For Bill checkbox is marked and you wish to use the GIPSA fee that is on the old certificate instead of this certificate for billing, mark the GIPSA On Orig. checkbox.
The computer will automatically fill in Amt. $$. (This will not display if you marked the Don't Show Amount checkbox in the Control File Maintenance.)
When you have finished entering data on the first screen, click on tab 2 or press [Alt][2] to display the second screen as follows:
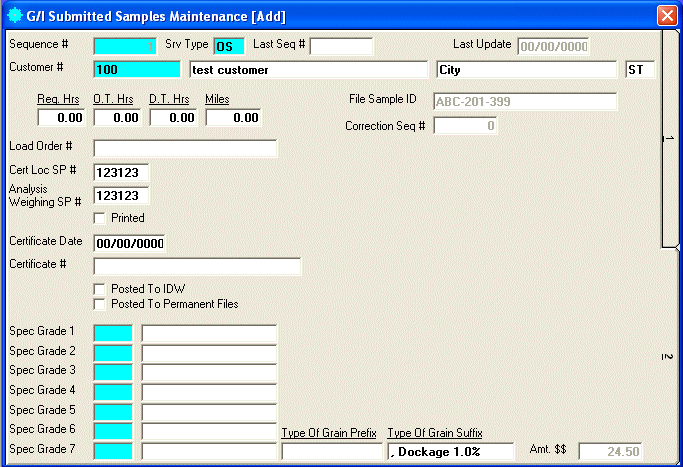
Enter Reg Hrs. (Regular Hours), O.T. Hrs. (Overtime Hours), D.T. Hrs. (Double Time Hours), and/or Miles that you wish to bill for this sample.
Enter the Load Order # for this sample.
Enter the Cert Loc SP # (Certificate Location Service Point Number) for this sample. This will be automatically filled in by Certificate Location SP # which was setup in the Control File Maintenance.
Enter the Analysis Weighing SP # (Analysis Weighing Service Point Number) for this sample. This will be automatically filled in by the Service Point # of the Location Code that you entered.
If the certificate was already printed, mark the Printed checkbox. (This will be checked automatically when you print an original certificate for this sample.)
Enter the Certificate Date for this sample. (This will be filled in automatically when you print an original certificate for this sample.)
Enter the Certificate # for this sample. (This will be filled in automatically when you print a certificate (original or copy) for this sample.)
If this sample was already posted to IDW (Inspection Data Warehouse), mark the Posted To IDW checkbox. (This will be checked automatically when you post this sample to IDW.)
If this sample was already posted to permanent files, mark the Posted To Permanent Files checkbox. (This will be checked automatically after you print this sample on an invoice and that invoice gets posted.)
Enter Spec Grade 1-7 (Special Grade 1-7) (or Perform A Search to find one). The description will be displayed for verification and the Spec Grade Desc from the Factor file will also be added to the Type Of Grain Prefix or the Type Of Grain Suffix (based on how this special grade was setup in the Factor Maintenance). Continue this process until all special grades are defined for this sample.
Enter the File Sample ID for this sample. (The computer will replace File Sample ID with I.D. Of Sample and it will not be enabled if you have marked the Move ID Of Sample To File Sample ID checkbox in the Control File Maintenance.)
The computer will automatically fill in Correction Seq #. This will be filled in with the sequence # of the new sample that is correcting this sample.
The computer will automatically fill in Type Of Grain Prefix and Type Of Grain Suffix. These two fields will be used to fill in the Grade/Kind.
Review the data you have entered (or changed) on the screens. If you wish to SAVE and PRINT the certificate, click on the Print icon on the Toolbar, pick the Print option from the File Menu, or press [Ctrl][P]. If you wish to SAVE the information, click on the Save icon on the Toolbar, pick the Save option from the File Menu, or press [Ctrl][S]. If you do NOT wish to save the information, click on the Cancel icon on the toolbar, pick the Cancel option from the File Menu, or press [Ctrl][L].